We are back for exercise II of the Superbadge: Advanced Flow for Agentforce. In this exercise we are going to configure the Customer Verification functionality via AI of the Agent Esso.
If you missed Exercise I please click here: https://howtoagentforce.com/2025/08/11/how-to-finish-exercise-i-create-agent-esso-of-the-superbadge-advanced-flow-for-agentforce/
Here’s the link to the Superbadge trail for the Advanced Flow for Salesforce:
https://trailhead.salesforce.com/content/learn/superbadges/superbadge-flow-for-agentforce
Step 1: Create new field on the Contact Object: Last Customer Verification
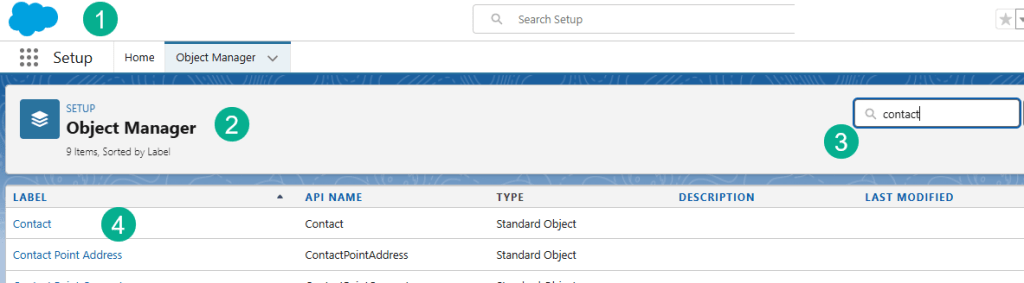
(1) In Setup.
(2) Click on Object Manager.
(3) Search for Contact.
(4) Select Contact.
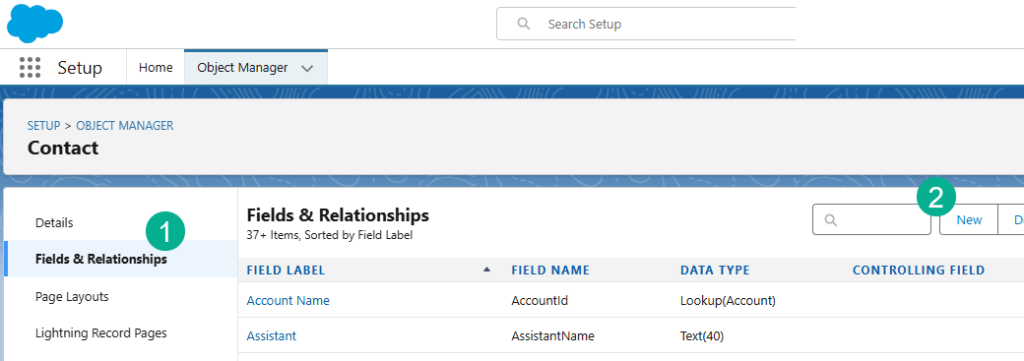
(1) Click on Fields & Relationships.
(2) Select New.
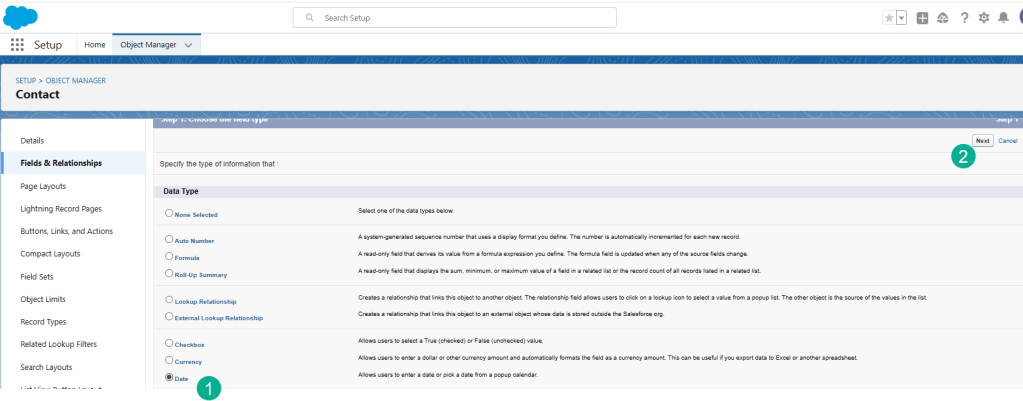
(1) Select Date type.
(2) Select Next.

(1) Enter In “Last Customer Verification.
(2) The Field Name will automatically populate.
(3) Click Next.

(1) Click Next.
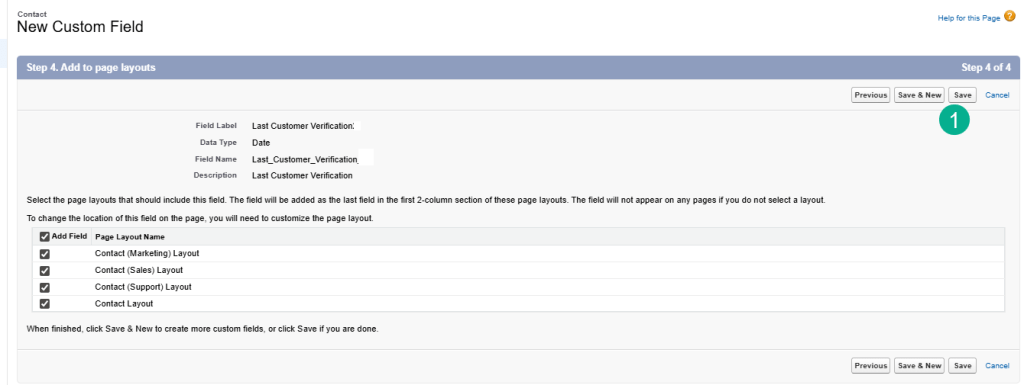
(1) Click Save.
Step 2: Add Custom Verification Topic to our Agent

(1) In our Esso Agent.
(2) Select the Topics tab.
(3) Select New.
(4) Select Add from Asset Library
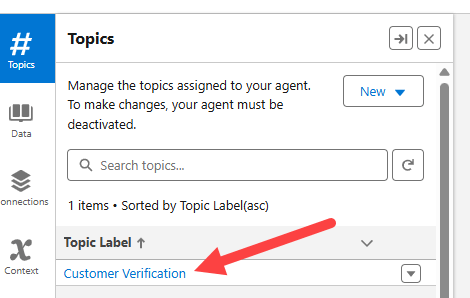
Click on the Customer Verification Topic. You should see the Action “Send Email with Verification Code. If you see any other Action remove it from the topic.
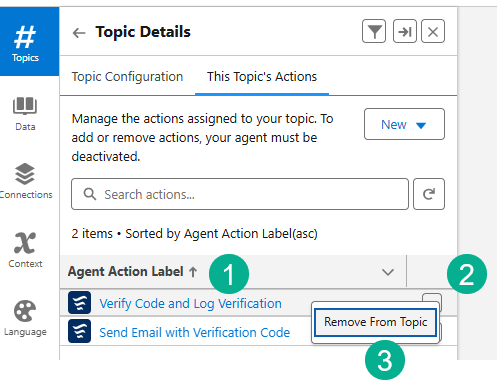
(1) For example there is an action named “Verify Code and Log Verification” which needs to be removed.
(2) Click on the box to the right.
(3) Click Remove From Topic.
Now we need to add back in the “Verify Customer” action.
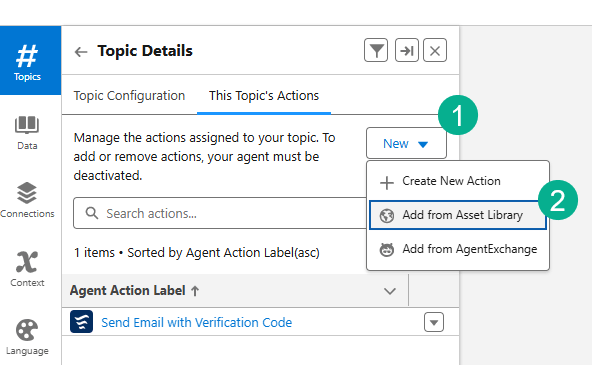
(1) Click New.
(2) Select “Add from Asset Library”
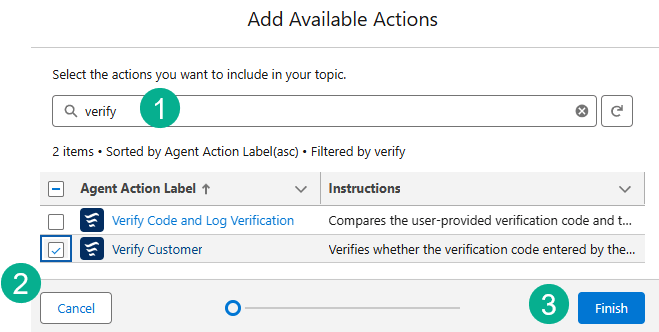
(1) Search for “Verify”.
(2) Check the box next to “Verify Customer”.
(3) Select Finish.
Step 3: Update Verify Code flow
First let’s navigate to the Verify Code flow.

(1) In Setup.
(2) Click on Flows.
(3) Click on the Verify Code flow.

Click on Save As New Flow.

(1) Paste in the name: Verify Code and Log Verification
(2) And the description: Compares the user-provided verification code and the emailed verification code that were both passed into the flow. Returns true if the codes match.
(3) Select Save.
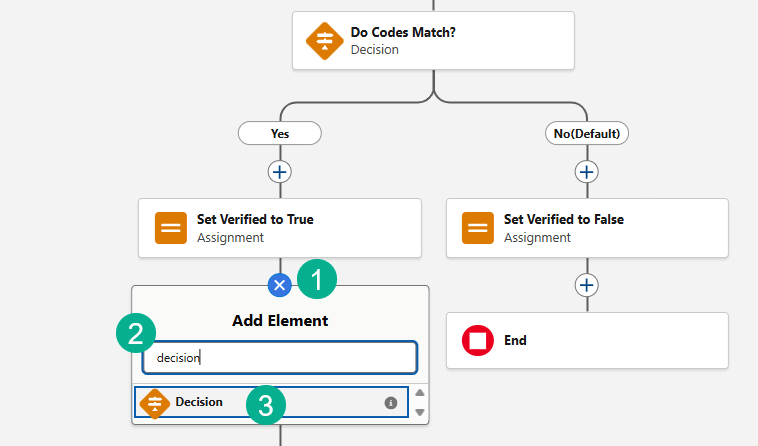
(1) Add a new activity under the Set Verified to True Activity.
(2) Search for Decision.
(3) Click on Decision.
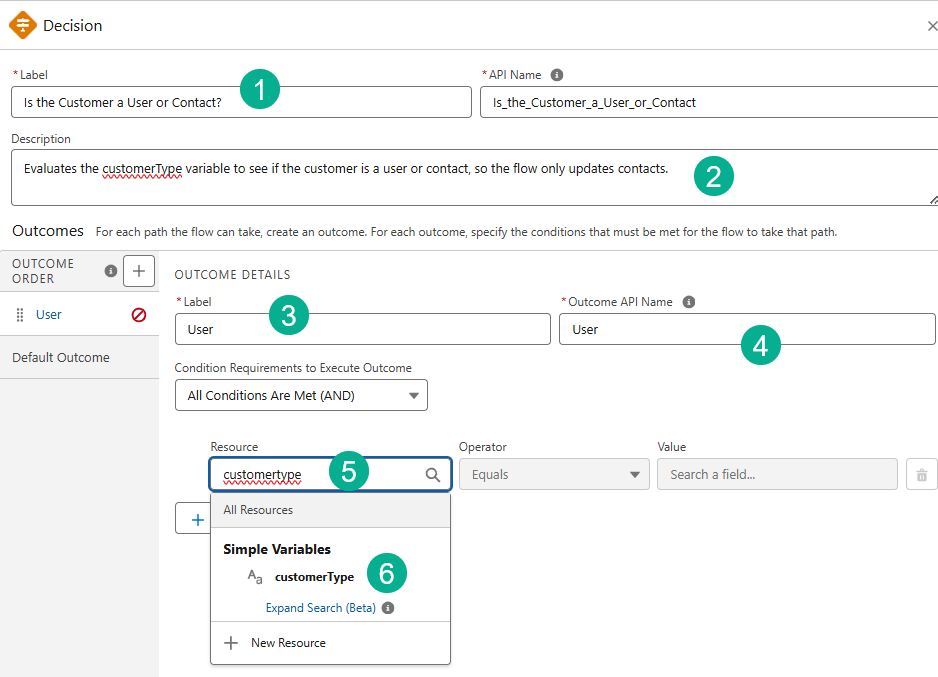
(1) Paste in the name of the decision: Is the Customer a User or Contact?
(2) Paste in the Description: Evaluates the customerType variable to see if the customer is a user or contact, so the flow only updates contacts.
(3) Paste in User for Label.
(4) And Outcome API Name.
(5) In Resource search for “User.”CustomerType”.
(6) And select the customerType field.

Type in “User” in the Value field, do not select a field in the drop down.

(1) Click on the Default Outcome section.
(2) Label it Contact.
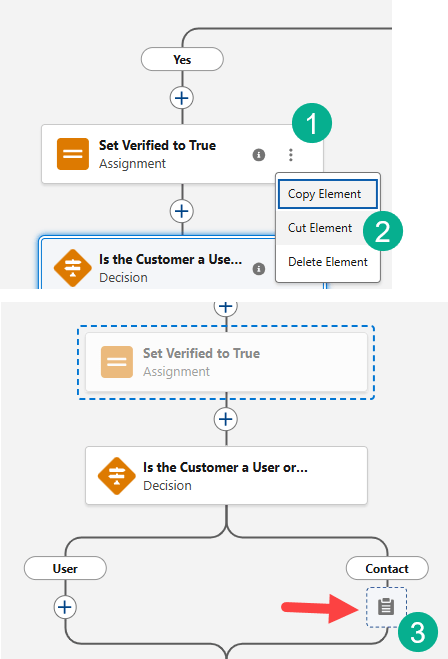
(1) Select the three dots on “Set Verified to True”.
(2) Click Cut Element.
(3) Click on the plus sign under the Contact path to paste in this activity.
Step 4: Create Update Contact’s Last Customer Verification activity
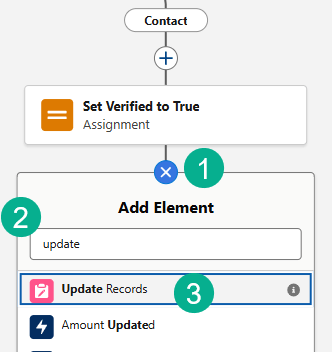
(1) Click on the plus circle below “Set Verified to True” activity.
(2) Search for Update.
(3) Click on the Update Records activity.

(1) Paste in the label: Update Contact’s Last Customer Verification
(2) Paste in the Description: Updates the verified customer’s contact record with today’s date in the Last Customer Verification field.
(3) Select specify conditions.
(4) Select the Contact object.
(5) Search for Contact ID.
(6) Search for CustomerID.
(7) Select “Last Customer Verification”.
(8) Carefully select Running Flow Interview > CurrentDate.
Step 5: Add Constants for the User Path
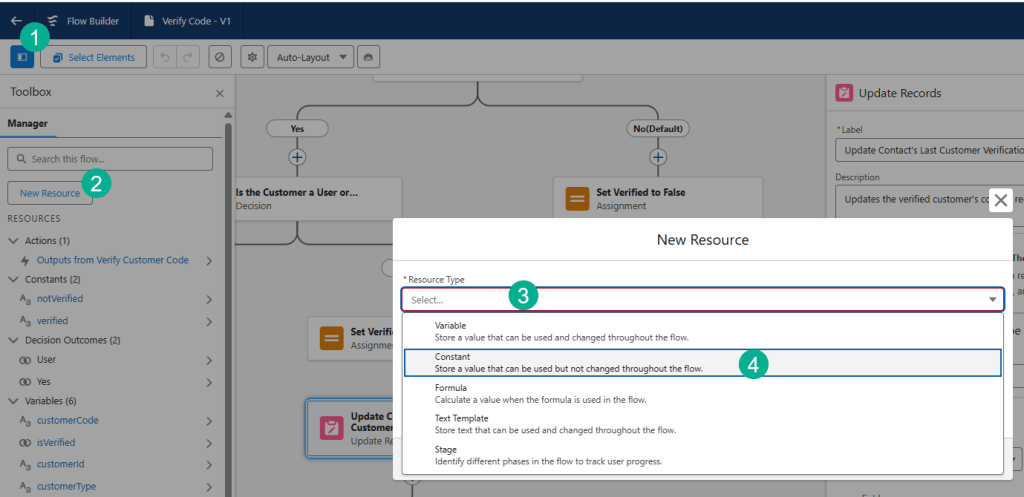
(1) Click on the Resources toggle.
(2) Click “New Resource”.
(3) Click on Select.
(4) Select Constant.
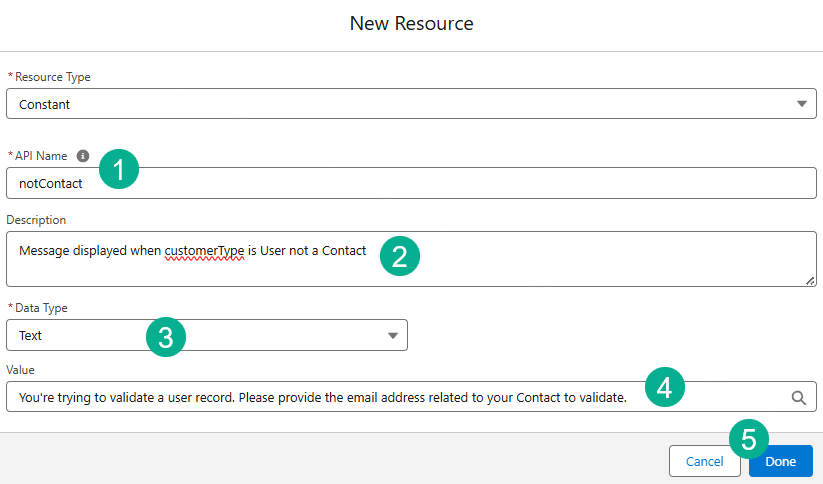
(1) Enter in: notContact.
(2) Enter in the description: Message displayed when customerType is User not a Contact
(3) Enter in Data Type of: Text.
(4) Enter in the value: You’re trying to validate a user record. Please provide the email address related to your Contact to validate.
(5) Click Done.
Add one more Resource:

(1) Select a Variable resource.
(2) Paste in the API Name of: messageAfterVerificationIfUser.
(3) And Description of: Message displayed to the end user if verification process is complete but customerType is User not a Contact.
(4) Select Data Type of: Text.
(5) Check both boxes available for Input and Output.
(6) Select Done.
Step 6: Create Assignment on User Path
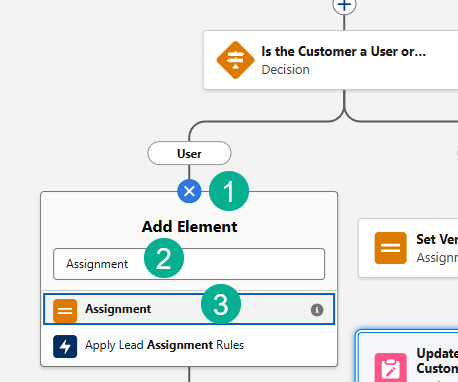
(1) Click on the plus circle under the User path.
(2) Search for Assignment.
(3) Select Assignment.
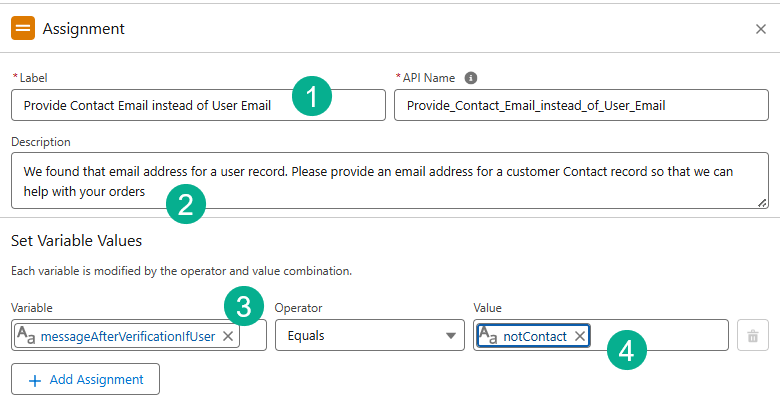
(1) Paste in the label: Provide Contact Email instead of User Email.
(2) Paste in the Description: We found that email address for a user record. Please provide an email address for a customer Contact record so that we can help with your orders
(3) Select the variable messageAfterVerificationifUser.
(4) Select the ‘notcontact” value.
Activate the flow.

Step 7: Create Agent Action
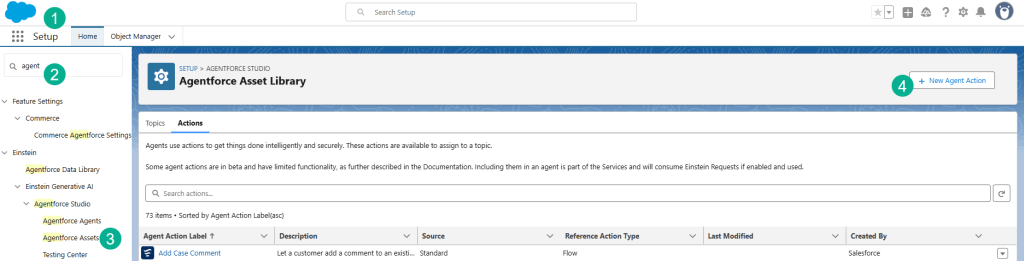
(1) In Setup.
(2) Search for Agent.
(3) Click on Agentforce Assets.
(4) Select “New Agent Action”.
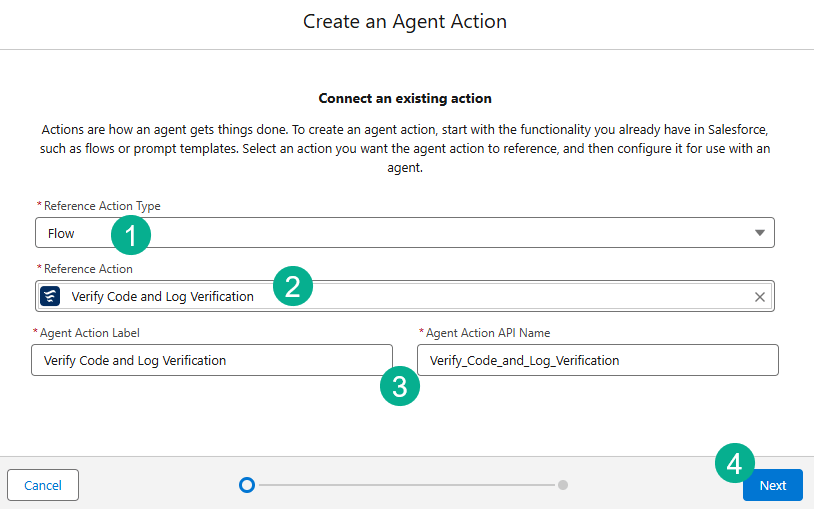
(1) Select Flow type.
(2) Select the Verify Code and Log Verification Action.
(3) Validate the Label.
(4) Click Next.

(1) Enter loading in the Loading text.
(2) Enter Authentication Key in the AuthenticationKey Instructions.
Click Finish.
Step 8: Update Permission Set for Esso Permissions

(1) Search for Permission Sets.
(2) Navigate to the “E” permission sets. and select Esso Permissions.
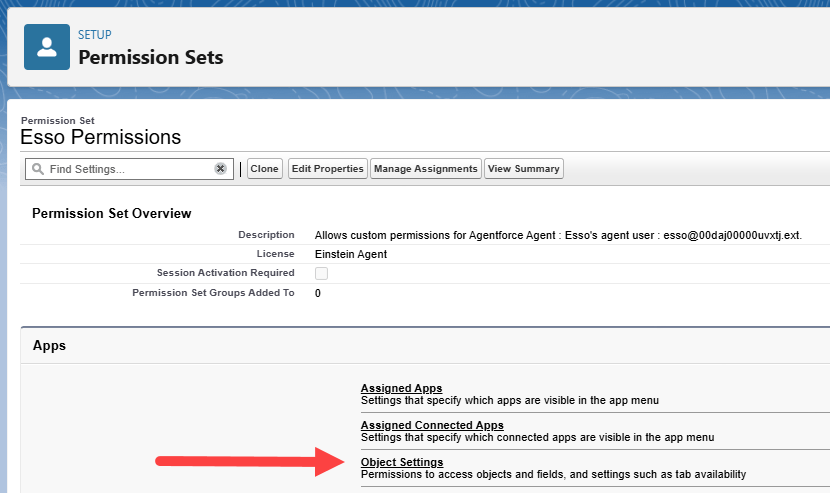
Click on Object Settings.
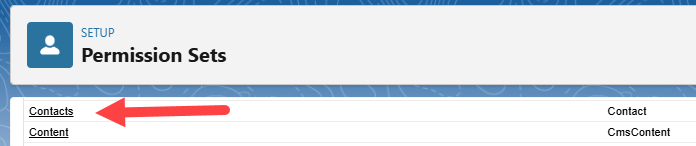
Scroll down to Contacts.
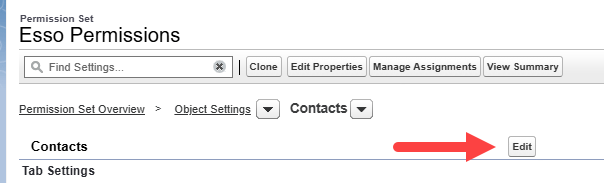
Click on Edit.
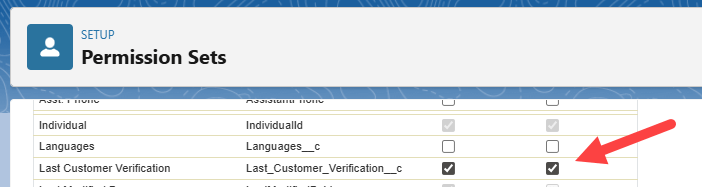
Grant access by clicking on both boxes. Click on Save.
Step 9: Add the Agentforce Service Agent Extended Object Access permission set (may not be needed)
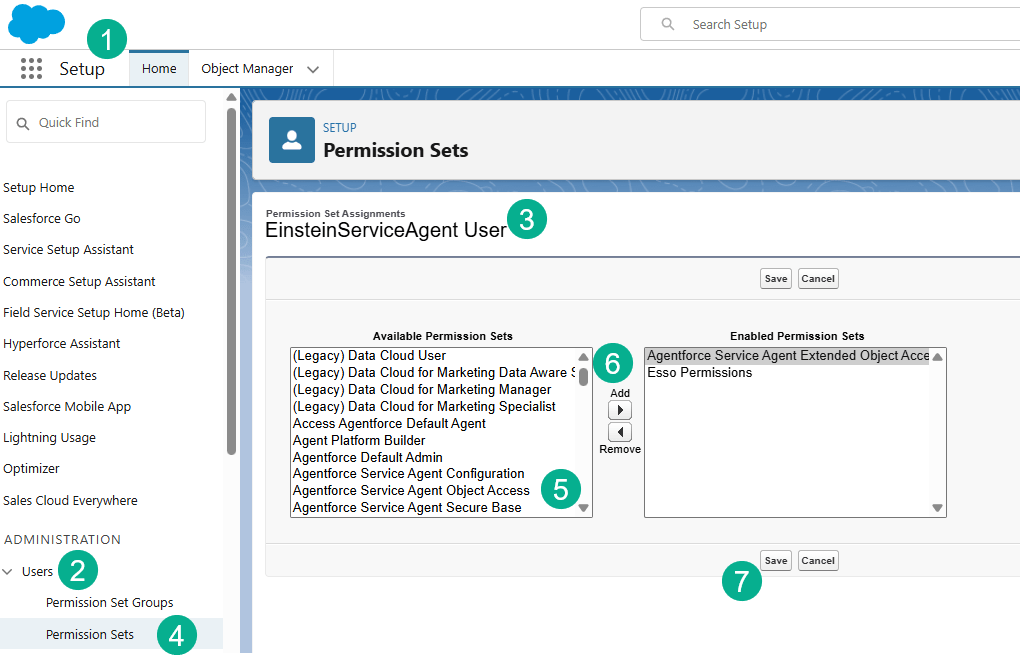
(1) In Setup.
(2) Select Users.
(3) And click on the Einstein Service Agent User.
(4) Edit their permission set assignments.
(5) Select the Agentforce Service Agent Extended Object Access permission set.
(6) Click Add.
(7) Click Save.
Step 10: Check the Challenge

We’ll see you in our next blog for Challenge III.
Interested in building a Proof of Concept of an Agent, we can help. Sign up for a free discovery session to build your first Agent. https://howtoagentforce.com/agentforce-agent-poc/
