
Welcome to exercise III of the Advanced Flow for Agentforce Superbadge. In this exercise we’ll be configuring flows to help facilitate automating handling refunds for our fictious Capricorn Coffee company.
In this exercise you will refactor the Refund Flow so it can be called by an agent. The Agent will create records in a new custom object called Refund Request and will include logic in case something goes wrong.
If you missed Exercise I please click here: https://howtoagentforce.com/2025/08/11/how-to-finish-exercise-i-create-agent-esso-of-the-superbadge-advanced-flow-for-agentforce/
If you missed Exercise II please click here: https://howtoagentforce.com/2025/08/19/how-to-finish-exercise-ii-configure-customer-verification-for-ai-interactions-of-the-superbadge-advanced-flow-for-agentforce/
Here’s the link to the Superbadge trail for the Advanced Flow for Salesforce:
https://trailhead.salesforce.com/content/learn/superbadges/superbadge-flow-for-agentforce
Step 1: Make a copy of the Refund Flow named Refund Request Flow

(1) In Setup search for Flows.
(2) Scroll down to Refund Flow and click on the flow.
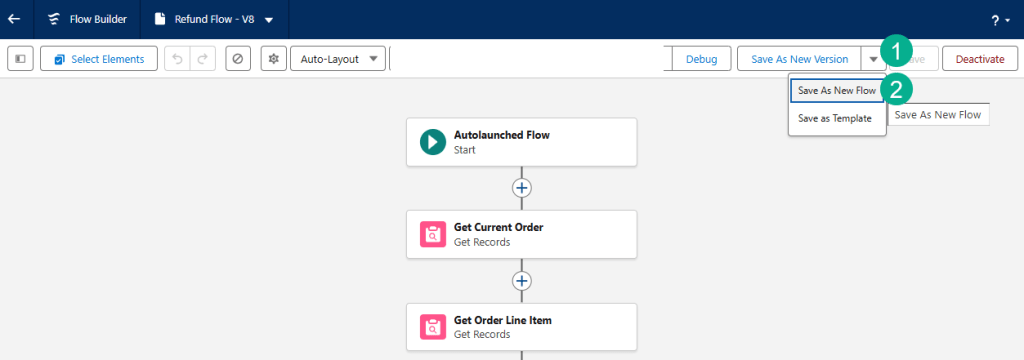
(1) Click on the arrow box next to Save As New Version.
(2) Select Save As New Flow.
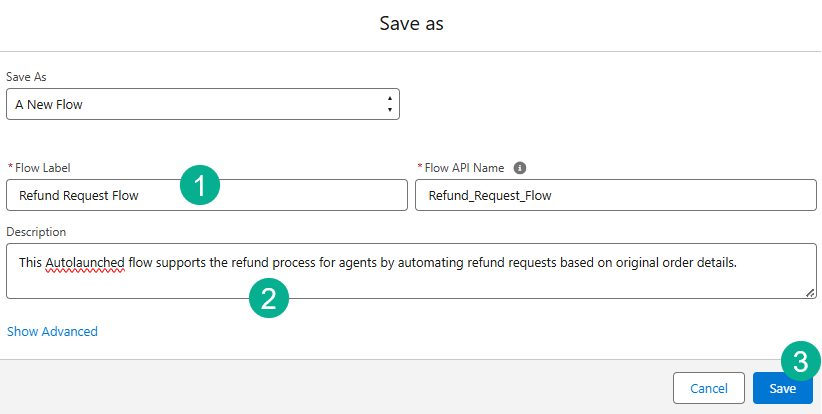
(1) In Flow Label paste in: Refund Request Flow
(2) In Description paste in: This Autolaunched flow supports the refund process for agents by automating refund requests based on original order details.
(3) Click Save.
Step 2: Edit Get Current Order Activity and Get Order Line Item Activity

(1) Search for Order Number and select the variable.
(2) Search for orderNumber and select the variable.

(1) Right below Order Number click on Add Condition.
(2) Search for Customer Authorized By Id and select that variable.
(3) You’ll need to create a new variable by clicking on the field.
(4) And selecting New Resource.

(1) Select Variable.
(2) Enter in: verifiedContactID
(3) And the description: Receives the ID of the contact we have verified who is interacting with the Agent.
(4) Select “Text” data type.
(5) Select Available for input.
(6) Click “Done”.

The filter should look like the above.
Next select the Get Order Line Item Activity.
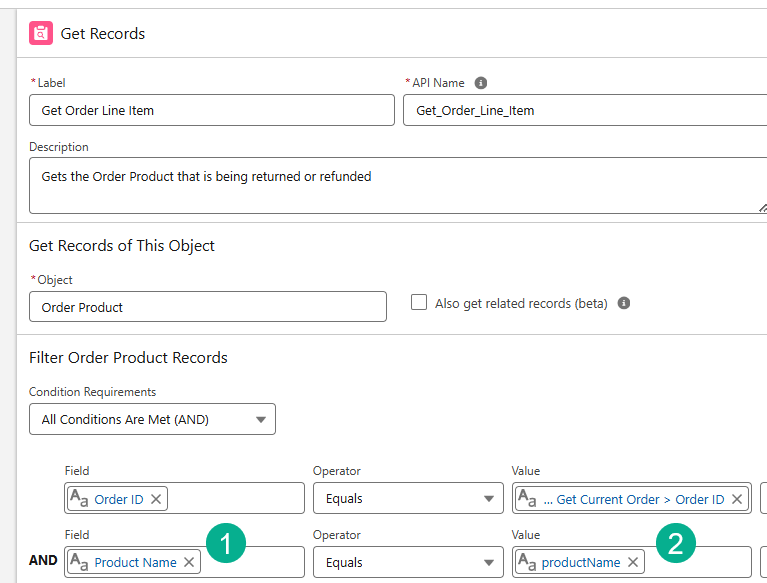
(1) In the second filter search for: Product Name.
(2) And in the value search for: productName.
Step 3: Add a decision Activity

(1) Click on the plus circle after Get Order Line Item.
(2) Search for Decision.
(3) Select the Decision Activity.
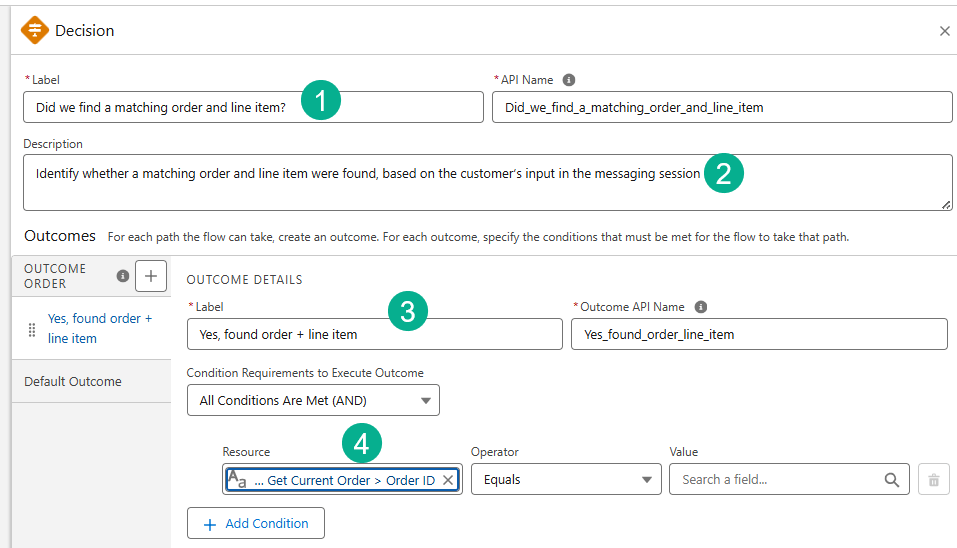
(1) Add in a Label: Did we find a matching order and line item?
(2) Add in the description: “Identify whether a matching order and line item were found, based on the customer’s input in the messaging session.”
(3) In the Outcome Order add the following Label: “Yes, found order + line item.”
(4) We need to add three conditions. The first see below on how to select the Resource.

(1) Click on the Resource.
(2) Order from Get Customer should popup, click that Object.
(3) Scroll down to the variables.
(4) Select “Order Id”. When you click on the field the syntax should look like the following:


(1) Select Is Null.
(2) With a value of False to complete this condition.
(3) Select Add Condition.

(1) Click on the resource.
(2) Select Order Product from Get Item.
(3) Navigate down to Order Product ID.
(4) When selected click on the resource field and the syntax should look like the following.

(1) Select Is Null.
(2) Select the value of False.
(3) And create another outcome.

In the new Outcome paste in the label of: Found only order, no line item
(1) Get the Order ID exactly how you set it in the last outcome above.
(2) Select the Product Id the same as in the last outcome.
(3) But set the value to “True”
(4) Add one more Outcome.
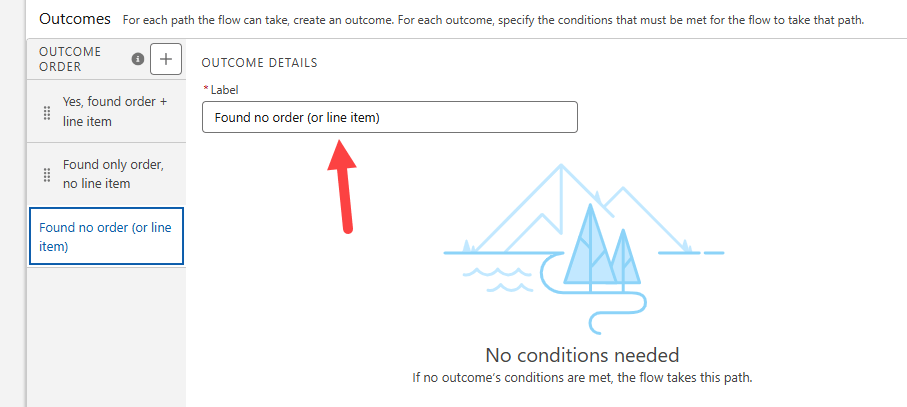
Paste in the Label: Found no order (or line item)
That completes the basic setup of the Decision activity.
Step 4: Update the Decision Activity

(1) In the three circles of the Create Refund Order activity, click on the three dots.
(2) Select Cut Element.

(1) When you cut the activity the activity will now have a blue dotted border.
(2) Click on the plus circle below the “Yes, found order…” order outcome.
Step 5: Update Create Refund Order/Create Refund Request

(1) Update Label to: Create Refund Request.
(2) Update API Name to: Create_Refund_Request.
(3) Add description: Gets information about the order the customer is requesting a refund for, gets order details, and uses those details to create a Refund Request record.
(4) Update Object to Refund Request.
(5) Search for Order in the first field.
(6) Select: Order from Get Current Order.
(7) Scroll down to find the field: Order ID.
(8) When finished the field should look like this.
(9) Click Add Field.

(1) Search for “Account”.
(2) Follow the same path as above to find Account ID and the final syntax should look like above.
(3) Click “Add Field”.

(1) Search for Amount.
(2) In the Value field search for Order and select Order Product from Get Order Line Item.
(3) Search for Total Price.
(4) The final value should look like this.
(5) Click Add Field.

(1) In the Field field search for Comments.
(2) In the Value field search for refundreason.
(3) Select Add Field.

(1) In the Field search for Date.
(2) Select Running Flow Interview.
(3) Select CurrentDate.
(4) The final syntax should look like this.
(5) Click Add Field.

In the last field search for Refund Request Name and select for both Field and Value.
Step 6: Add a fault path to the Create Records Element

(1) On the Create Refund Request activity, click on the three dots.
(2) Select “Add Fault Path”.

(1) Add a new activity under Fault.
(2) Search for Create.
(3) Select Create Records.

(1) Paste in Create Case for the Label.
(2) Enter the description: Creates a case in the event of any issues preventing the successful formation of a Refund Request record.
(3) Select “Manually”.
(4) Search for the Object: Case.
(5) Search for Contact ID.
(6) Search for verifiedContactID.
(7) Add Field.

(1) Search for Description.
(2) Click on New Resource.

(1) Select Text Template resource type.
(2) For API Name enter: caseDescription.
(3) For Description enter: Provides text for the description field on a case in the event of any issues preventing the successful formation of a Refund Request record.
(4) For the Body enter:
There was an error in the flow creating a Refund Request Record for Contact related here.
Order Number: {!Get_Current_Order.OrderNumber}
Order Product Name: {!Get_Order_Line_Item.Product_Name__c}
Fault Message: {!$Flow.FaultMessage}
Please investigate.
(5) Click Done.

Add a new field and (1) Search for “Status”.
(2) Search for “New”.

Add a new field and (1) Search for “Subject”.
(2) Paste in the following value: Error Creating Refund Request.
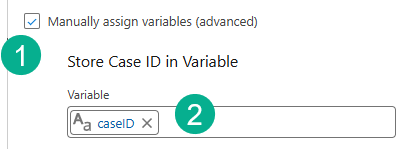
(1) Select Manually Assign Variables checkbox.
(2) Search for CaseID.
Step 7: Adjust existing Get Newly Created Refund Order Activity

(1) On the “Put Refund Id into Variable activity, click on the three dots.
(2) Select Delete Element.
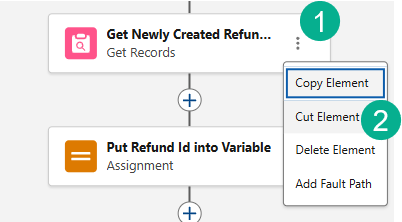
(1) Select the three dots on the Get Newly Created Refund activity.
(2) Select “Cut Element.”
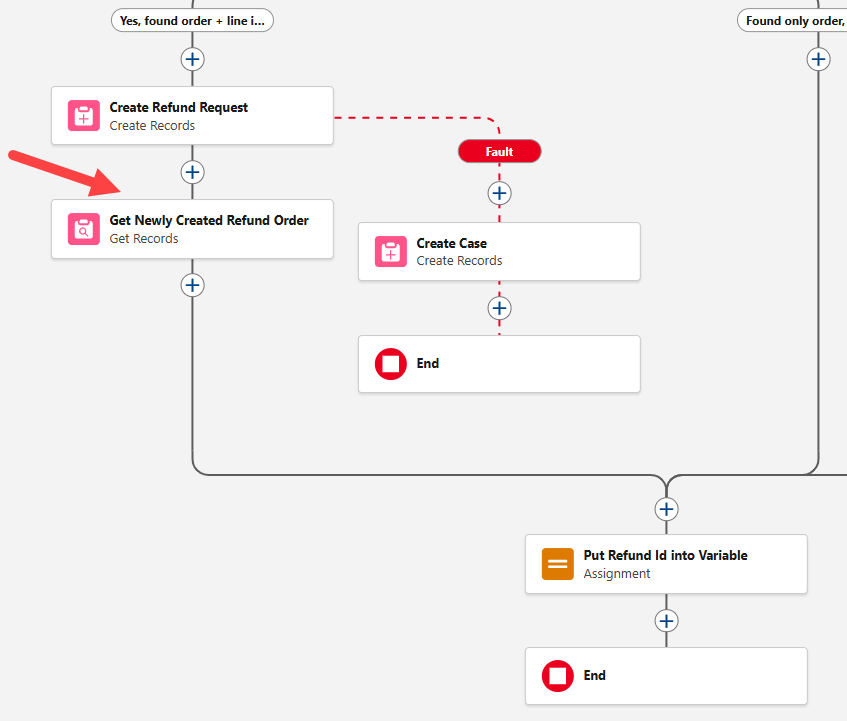
Paste it after the Create Refund Request Activity.

(1) In the Label paste in the following: Get_Newly_Created_Refund_Request and make sure the API Name = Get_Newly_Created_Refund_Request
(2) In the description field add: Gets the recently created Refund Request to summarize as an output back to the customer acknowledging the request has been created
(3) Change the object to: Refund Request.
(4) Search for Record ID.
(5) Search for Refund.
(6) Select Refund Requestid from Cr…
(7) In the end the Value should look like above.
Further down in the activity make more updates.
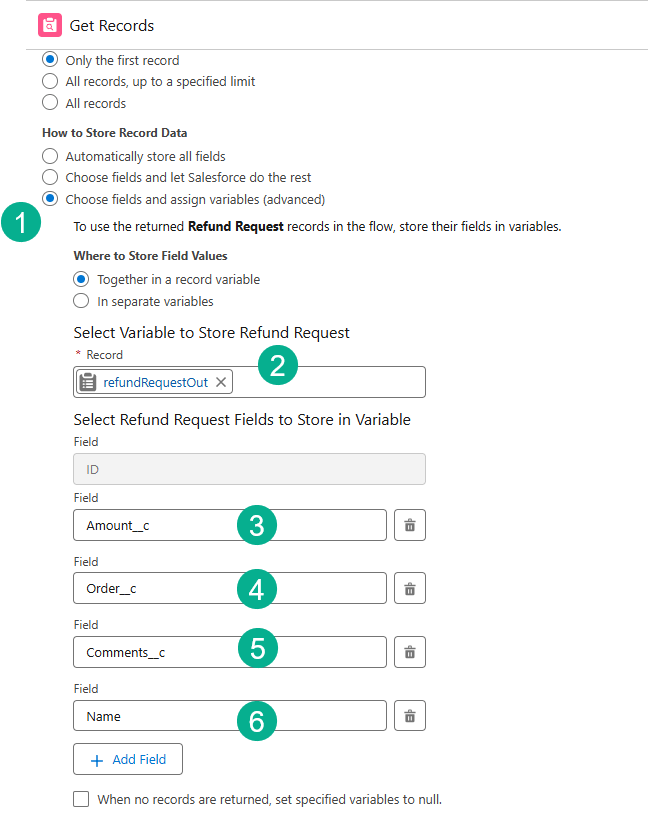
(1) Select Choose fields and assign variables.
(2) Select the refundRequestOut field.
(3) Select the Amount field.
(4) Select the Order field.
(5) Select the Comments field.
(6) Select the Name field.
Step 8: Create Get Order Line Items on Found Order Activity
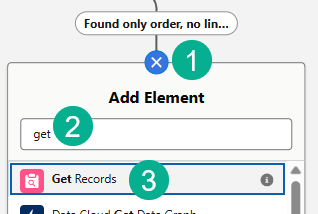
(1) On the 2nd outcome/path click on the plus sign under “Found only order, no…”
(2) Search for Get.
(3) Select Get Records.
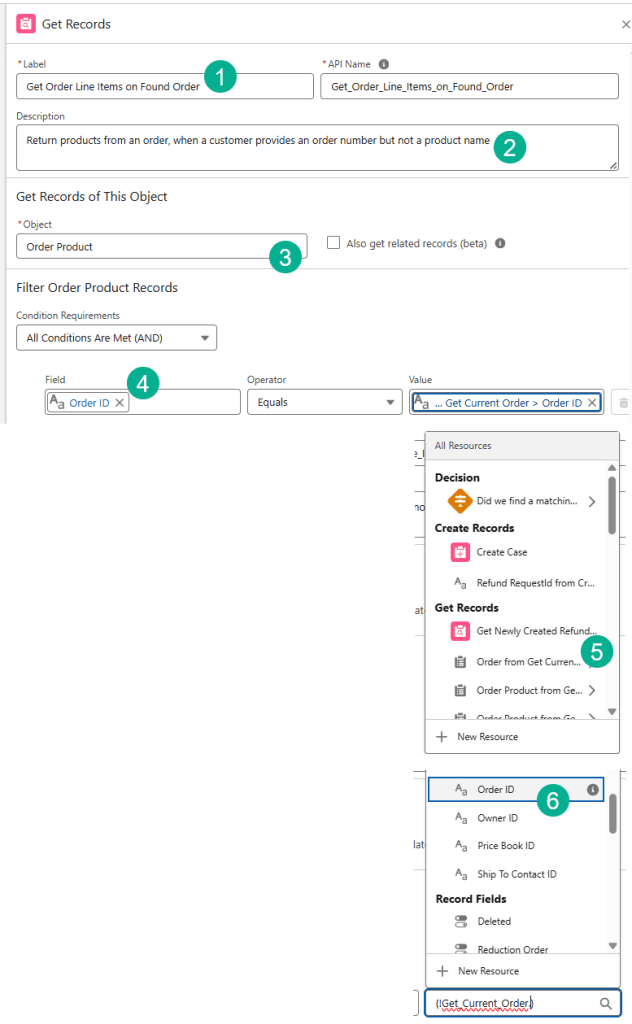
(1) In the Label field paste in: Get Order Line Items on Found Order
(2) For the description paste in: Return products from an order, when a customer provides an order number but not a product name
(3) Select the Order Product object.
(4) Search for Order Id.
(5) Under “Order from Get Current…”
(6) Select the Order ID.
At the bottom of this activity continue filling out…

(1) Select “all records”.
(2) Select “Choose fields and assign variables”
(3) Search for orderProducts.
(4) Search for Product Name.
(5) Search for OrderItemNumber.
Step 9: Create Get This Contact’s Orders Activity

(1) Under the third outcome path, click on the plus sign under “Found no order (or line…).
(2) Search for “Get”.
(3) Select Get Records.
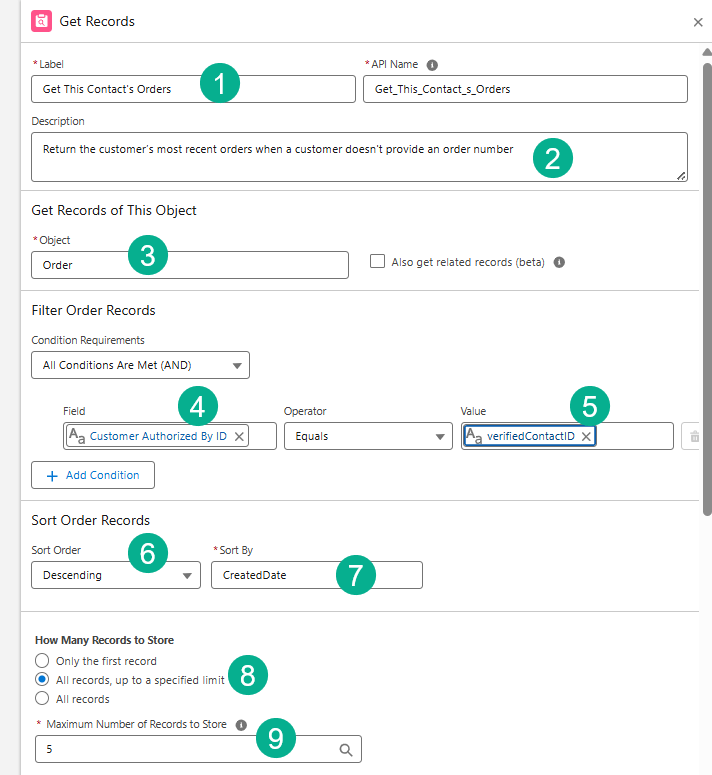
(1) For label paste in: Get This Contact’s Orders
(2) For description paste in: Return the customer’s most recent orders when a customer doesn’t provide an order number
(3) Select the Order Object.
(4) Search for Company Authorized by ID.
(5) Search for verifiedContactID.
(6) Select Descending.
(7) Select CreatedDate.
(8) Select All records, up to a specified limit.
(9) Select 5 records to store.
(1) Click on the blue icon in the upper left to create a new variable.
(2) Select New Resource.

(1) Select Variable.
(2) Paste in: customersOrders.
(3) Paste in the description: Returns the 5 most recent orders made by the customer. Be sure to list their names, numbers, and order dates to the customer in the case that the customer doesn’t know their order number.
(4) Select Record data type.
(5) Select the Order object.
(6) Select Allow multiple values.
(7) Select Done.
With the variable created we can now fill out how to store the record data.

(1) Select Choose fields and assign variables.
(2) Search for customersOrders.
(3) Enter CreatedDate.
(4) Enter Name.
(5) Enter Order Number.
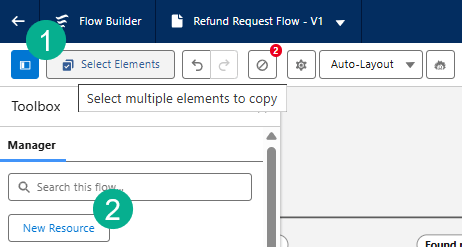
Step 10: Delete elements no longer needed in the flow
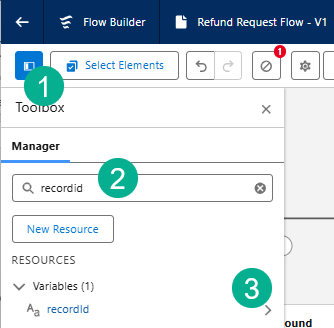
(1) Click on the blue Resource button in the upper left corner.
(2) Search for RecordID.
(3) Click on the arrow for the variable.
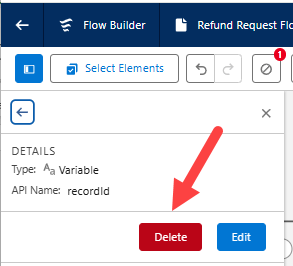
Click delete.
Follow the same steps for productId, and refundNumber.
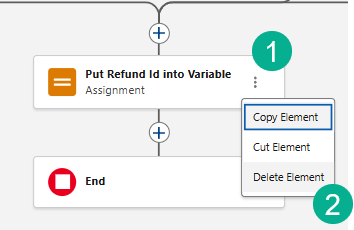
(1) If you haven’t already please delete the Put Refund ID assignment.
(2) By selecting Delete Element.
And don’t forget to save and activate your flow.
Step 11: Create an Agent Action for the Refund Request Process
Before you create the new action, make sure you’ve checked the output box for two of the custom variables: customersOrders and orderProducts.
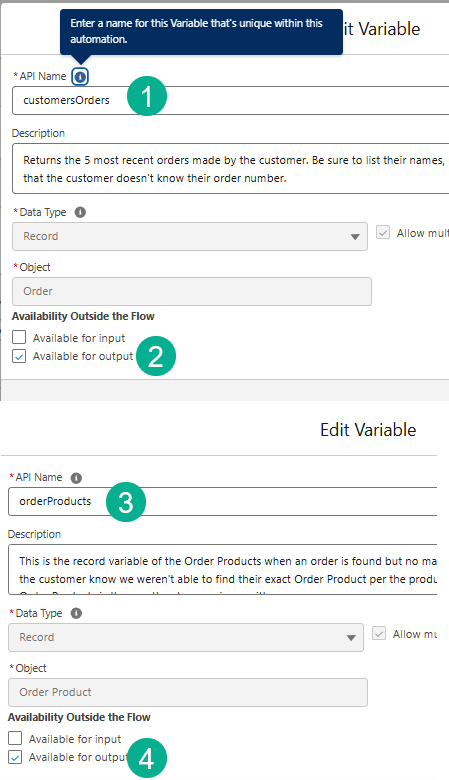
(1) For customersOrders.
(2) Select the Available for output box.
(3) For orderProducts.
(4) Select the Available for output box.
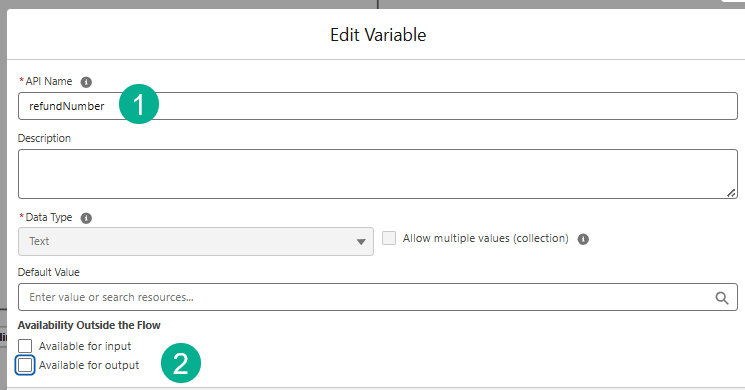
(1) And refundNumber
(2) Does not have the Available for output checked.
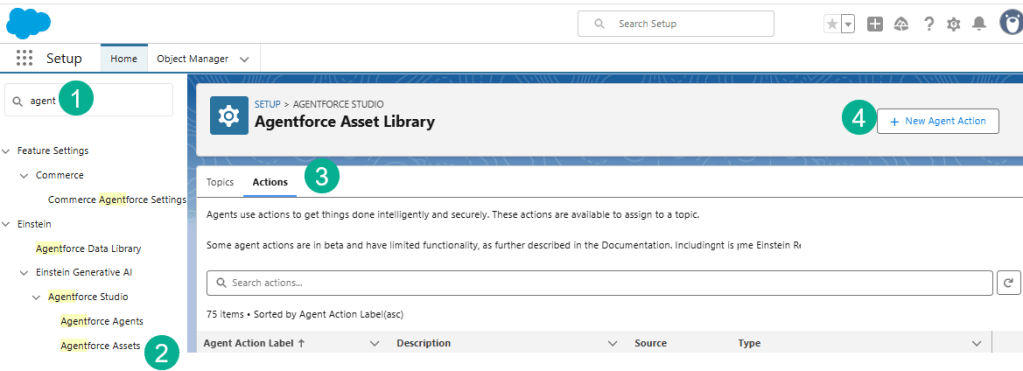
(1) In Setup search for Agent.
(2) Select Agentforce Assets.
(3) Select Actions.
(4) Select New Agent Action.

(1) For type select Flow.
(2) Select the Refund Request Flow.
(3) Select Next.
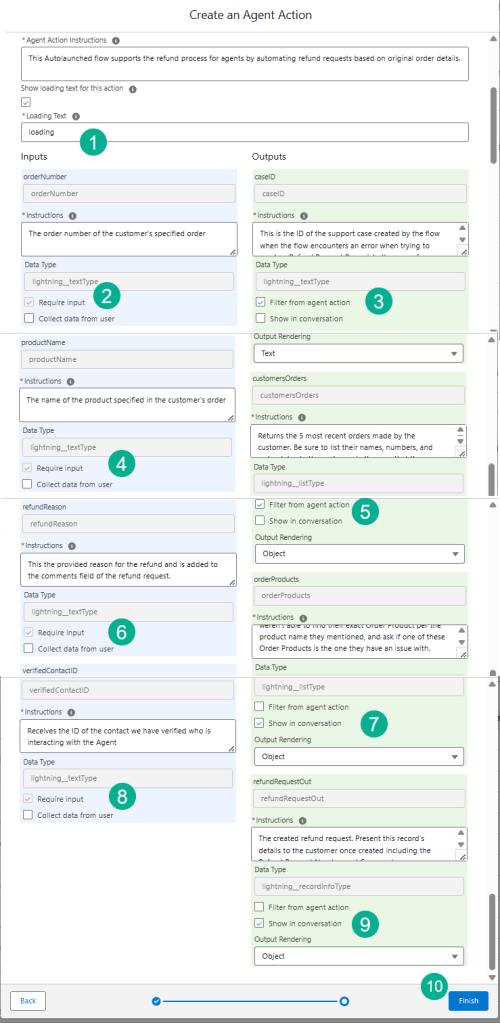
(1) In Loading Text enter “loading”.
(2) Check Require Input for orderNumber.
(3) Check Filter from agent action for caseID.
(4) Check Require Input for productName.
(5) Check Filter from agent action for customersOrders.
(6) Check Require Input for refundReason.
(7) Check Show in Conversation for orderProducts.
(8) Check Require Input for verifiedContactID.
(9) Check Show in Conversation for refundRequestOut.
(10) Click Finish.
Step 12: Create the Refund Process topic

(1) Search for Agent.
(2) Select Agentforce Agents.
(3) Select The Esso Agent.

Select Open in Builder.

(1) Under Topics (Make sure your agent isn’t active.)
(2) Click on New.
(3) Select “New Topic”.
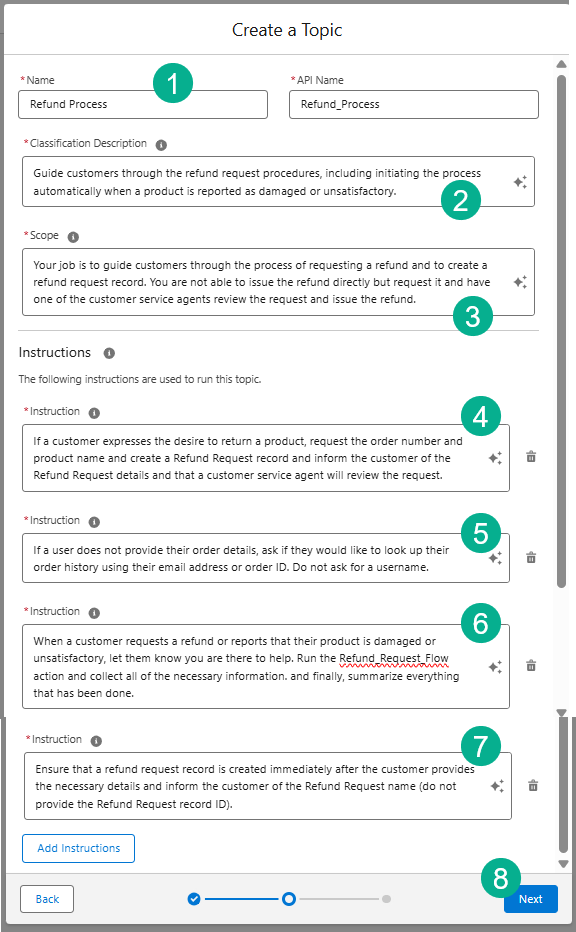
(1) Enter in the Name: Refund Process.
(2) Enter in the Classification Description: Guide customers through the refund request procedures, including initiating the process automatically when a product is reported as damaged or unsatisfactory.
(3) Enter in the scope: Your job is to guide customers through the process of requesting a refund and to create a refund request record. You are not able to issue the refund directly but request it and have one of the customer service agents review the request and issue the refund.
(4) Enter in instruction #1: If a customer expresses the desire to return a product, request the order number and product name and create a Refund Request record and inform the customer of the Refund Request details and that a customer service agent will review the request.
(5) Enter in instruction #2: If a user does not provide their order details, ask if they would like to look up their order history using their email address or order ID. Do not ask for a username.
(6) Enter in instruction #3: When a customer requests a refund or reports that their product is damaged or unsatisfactory, let them know you are there to help. Run the Refund_Request_Flow action and collect all of the necessary information. and finally, summarize everything that has been done.
(7) Enter in instruction #4: Ensure that a refund request record is created immediately after the customer provides the necessary details and inform the customer of the Refund Request name (do not provide the Refund Request record ID).
(8) Click Next.
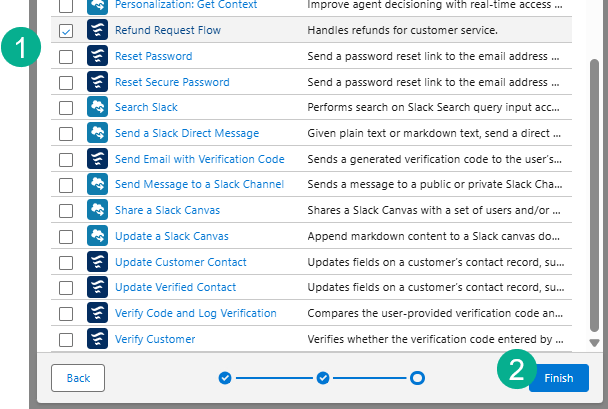
(1) Search for the Refund Request Flow action.
(2) Select Finish.
That should do it. Check to see if you can complete the exercise.


Step 13. Handling error messages when you try to Check the Challenge.

You might run into error messages like the one’s above as this exercise is very long and requires specific selections in the flow and Agent action.
Take your time, read the errors carefully as they are helpful and make the corrections then check your challenge again and good luck!
Interested in building a Proof of Concept of an Agent, we can help. Sign up for a free discovery session to build your first Agent. https://howtoagentforce.com/agentforce-agent-poc/
