In this blog you will build an Agentforce Agent that triggers a Salesforce flow taking a specific action to support a use case. Connecting Flows to Agents is a powerful next step as it expands their capability beyond just providing information to taking action.
We’ll be following along to the excellent exercises provided by Salesforce at the following link: https://developer.salesforce.com/agentforce-workshop/agents/1-get-started
The use case:
Coral Cloud resorts wants to issue a credit to resort guests as part of their top notch customer service. And ideally they would like to enable an agent to automatically create those credits in Salesforce.
The team has created a Credit object that contains all the required fields. Now they want to create a flow that creates a Credit to enable the agent.
Step I: Create the flow
We’re going to start first by creating a flow that creates the credit record.
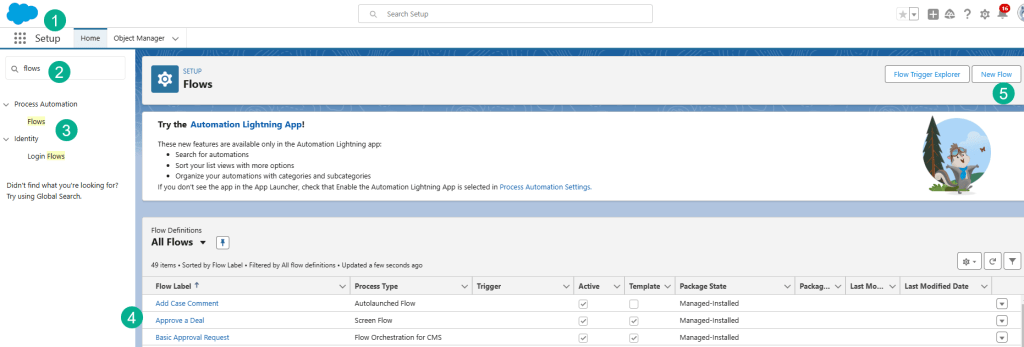
(1) In Salesforce Setup.
(2) In the search bar type Flows.
(3) Click on Flows under Process Automation.
(4) You can view all the existing flows.
(5) But let’s create a new Flow.

(1) Start from Scratch should be automatically select.
(2) Click Next.

(1) Select Autolaunched Flow (No Trigger).
(2) And click Create.

(1) Open the resources panel by clicking on the icon to the left of the Select Elements button.
(2) Click on New Resource.
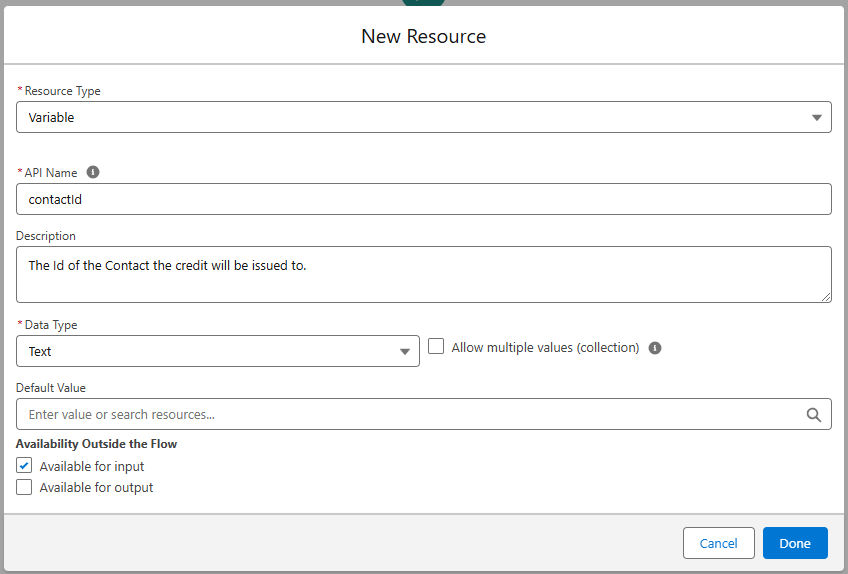
Fill out three resources filling in details from the following:
| Resource Type | API Name | Description | Data Type | Available for Input | Available for Output |
| Variable | contactid | The Id of the Contact the credit will be issued to. | Text | Checked | UnChecked |
| Variable | amount | The amount of the resort credit. | Number (Decimal places: 0) | Checked | UnChecked |
| Variable | creditid | The id of the Credit record that was created. | Text | UnChecked | Checked |
Here’s an example of the first variable:
When completed you should see all three values created.

Step II: Create a credit record
Click on the Plus sign icon on the flow canvas to create a credit record.
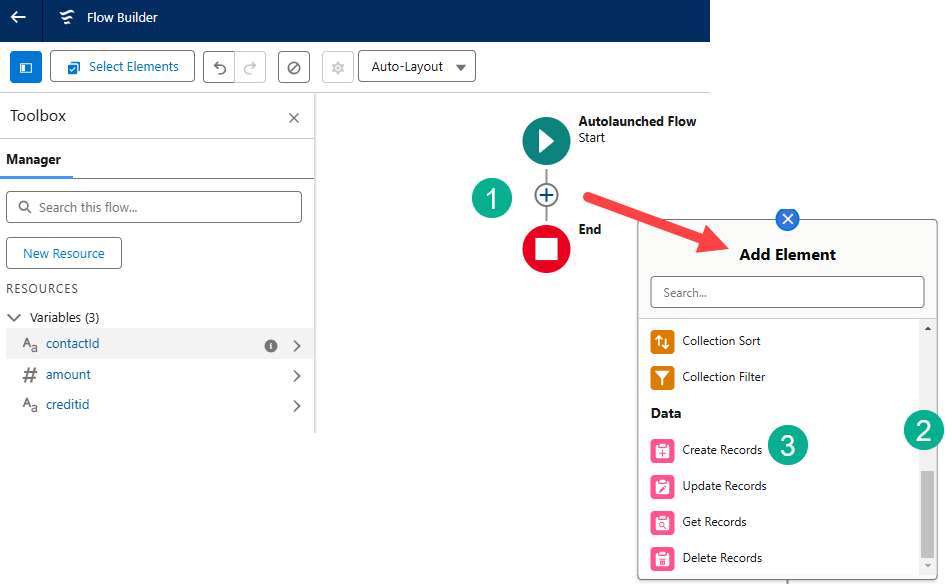
(1) Click on the plus sign icon.
(2) You’ll need to scroll down to the Data section.
(3) And select Create Records.
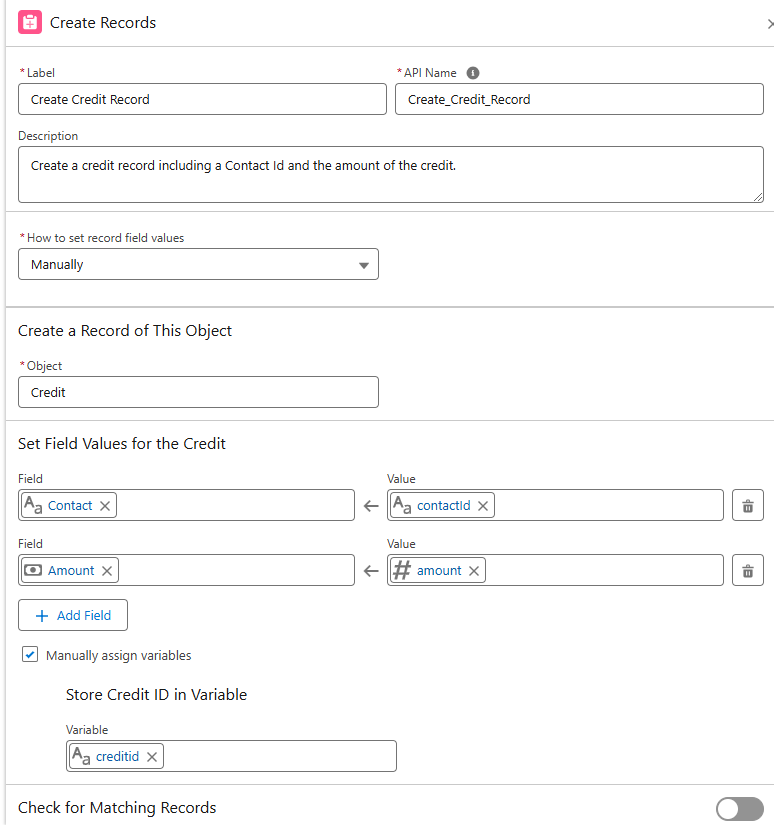
Fill in the record with the following:
| Field | Value |
| Label | Create Credit Record |
| API Name | Keep default |
| Description | Create a credit record including a Contact Id and the amount of the credit. |
| How to Set the Record Field Values | Manually (default) |
| Object | Credit |
Under Set Field Values for the Credit, add two fields with the information as follows:
| Field | Value |
| Contact__c | contactid |
| Amount__c | amount |

(1) check Manually assign variables.
(2) Add creditid as the variable in Store Credit ID.
Your form should look like this after completing the steps above.
If all looks good, save and activate the flow using the following info:
| Field | Value |
| Label | Issue Resort Credit |
| API Name | Keep default |
| Description | Issue a resort credit for a Contact |

And don’t forget to click Activate.

Step III: Create the Agent Custom Action
Now that you have created your flow you can create a custom action that can be assigned to your agent.

(1) In Setup.
(2) Search for Agent Actions.
(3) Click on Agent Actions.
(4) View all of the existing Agent Actions.
(5) Click New Agent Action.
Configure the action as follows:
| Field | Value |
| Reference Action Type | Flow |
| Reference Action | Issue Resort Credit |
| Agent Action Label | Keep default |
| Agent Action API Name | Keep default |
When done the action should look like this:
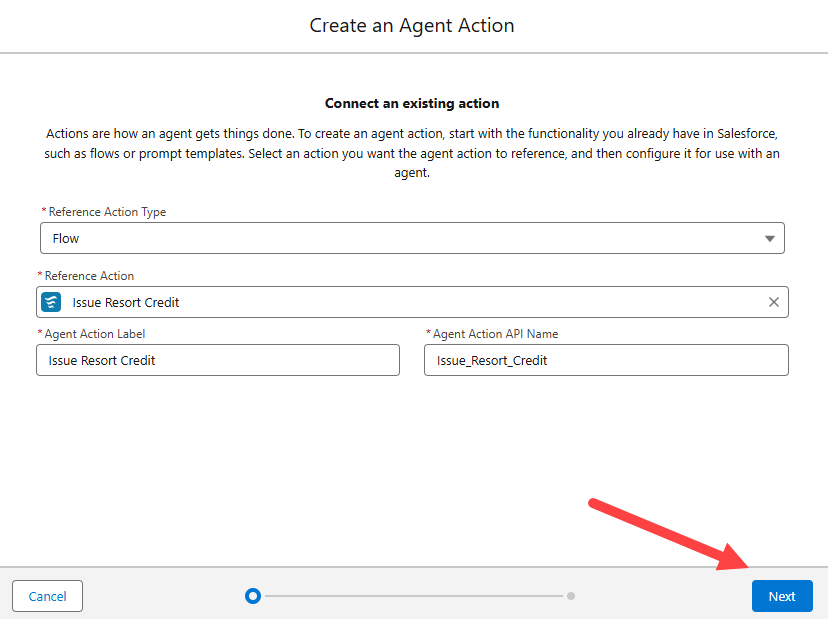
Click Next.

(1) Leave Agent Action Instructions as is.
(2) Check the Require Input box for amount.
(3) Check the Require Input box for contactid.
(4) Check the Show in Conversation box for creditid.
(5) Click Finish.
Step IV: Add the Action to your Agentforce Agent

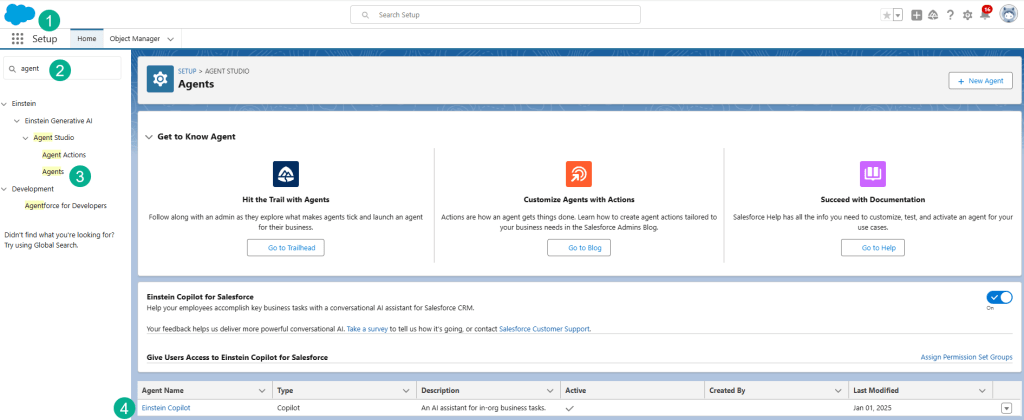
(1) In Setup.
(2) Search for Agent.
(3) Click on Agents under Einstein Generative AI.
4.) Click on Einstein CoPilot.

Click Open in Builder.

Deactivate the Agent so you can add the Action.
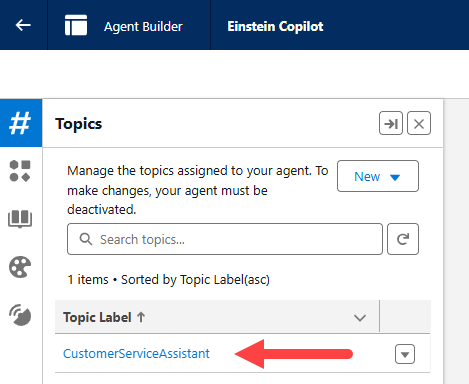
Click on the CustomerServiceAssistant app.
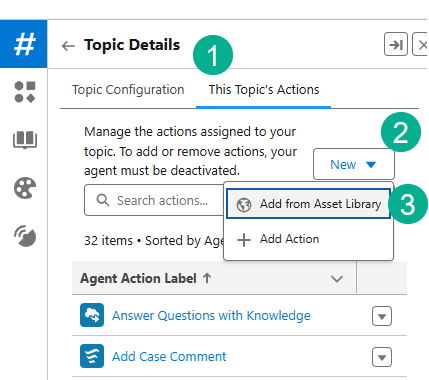
(1) Click on the “This Topic’s Actions” tab.
(2) Click on the New button.
(3) Click the Add from Asset Library option.
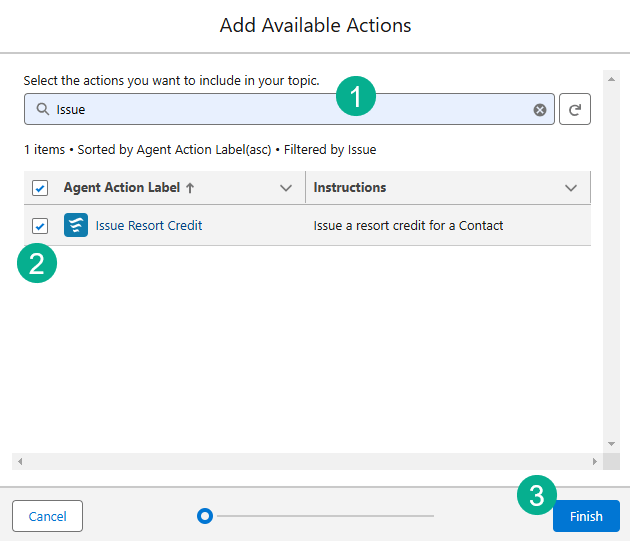
(1) Search for the new action (Issue Resort Credit).
(2) Click on the box to the left of the action.
(3) Click Finish.
Step V: Validate Action works with the Agentforce Agent

(1) Still in the Agent, in the Conversation Preview window past in the following text:
Issue $100 resort credit to contact named Sofia Rodriguez
(2) Click enter or the arrow.
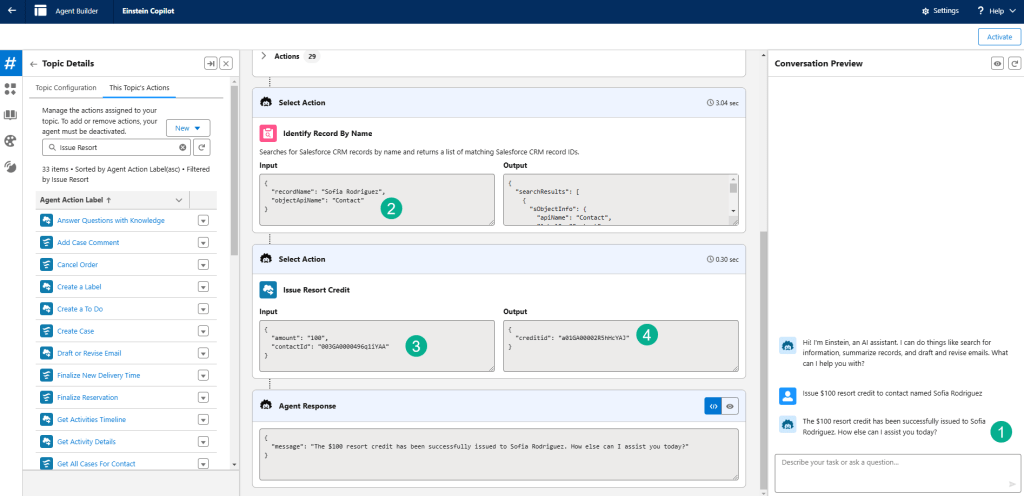
(1) Einstein returns a response saying the credit has been issued.
(2) Under the hood Einstein tracks down Sofia Rodriquez’s contact record.
(3) It inputs the ContactID and the credit amount of $100.
(4) The CreditID is generated identifying the new credit record in Salesforce.
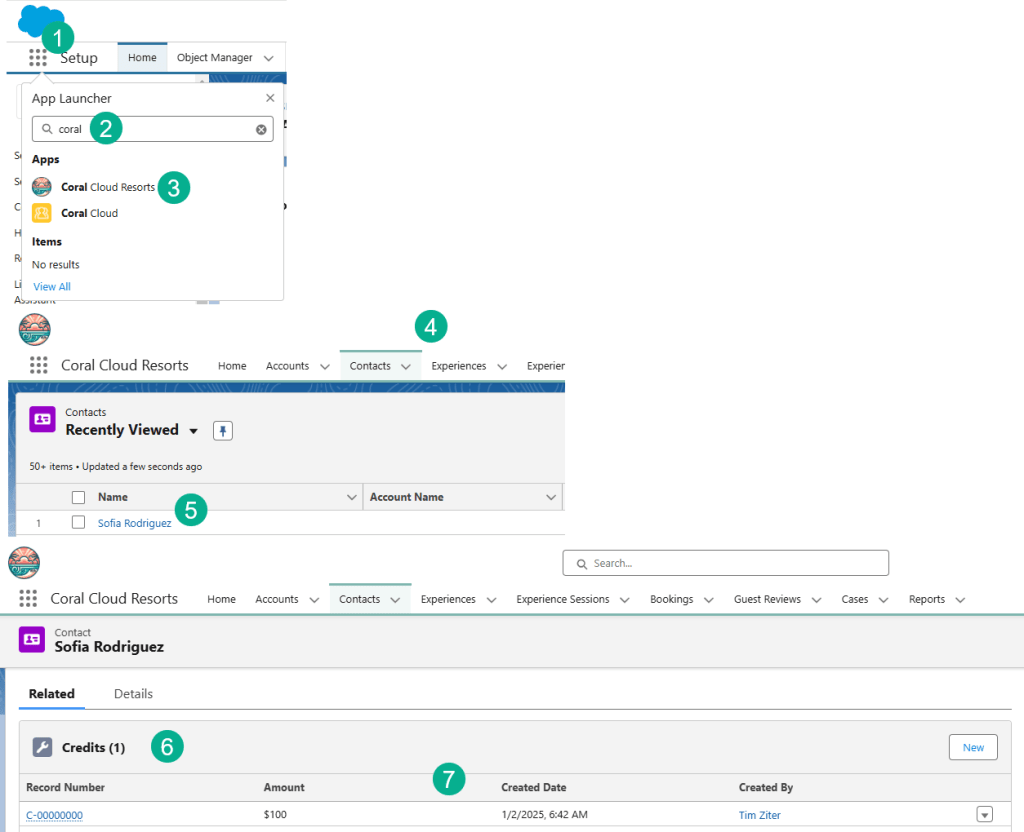
(1) Click on the nine dot App launcher.
(2) Search for Coral Cloud Resorts.
(3) Click on the Coral Cloud app.
(4) Click on the Contact tab.
(5) Sofia should be at the top of your list, click into her contact record.
(6) Under the related tab there should be a section on Credits.
(7) View the credit that was just created for $100 created by you.
Adding Flow Builder into Agentforce actions is an absolute game changer as it opens up an incredible playbook of impactful actions that can be automated with Agents.
