Let’s learn how to build an AI Service Agent with Salesforce Agentforce!
This is a hands-on walkthrough of the amazing BuiltWithAgentforce quest challenge & module released back in late 2024. Although the deadline has passed it’s still a great exercise and worth spending the time as you explore Agentforce.
For full details on the BuiltWithAgentforce trailmix click here: https://trailhead.salesforce.com/users/teamtrailhead/trailmixes/quest-built-with-agentforce-video
Here’s an overview of the Steps:
(1) Setup an Agentforce enabled playground
(2) Set up your new Agentforce playground org
(3) Create the Agentforce Agent
(4) Test the Agent
(5) Publish and Update – publish the web deployment and update the flow
(6) Add the Agent to the Experience Cloud site (Coral Cloud)
(7) View the Agent as a customer
What you will accomplish: A lot!
This is a fantastic exercise as it not only covers Prompt Builder and Agents but also it walks you through executing the Agent on an Experience Cloud website.
Use Case:
Here at Coral Cloud Resorts we want to make it quick and easy for guests to add our amazing resort experiences during their stay.
Problem:
At Coral Cloud staffing is always a problem and the resort tends to focus staffing in areas that require face to face interaction with guests. So the call center back office is always short staffed. The result is that our resort experience attendance has been suffering.
Solution:
With Agentforce we can create a friendly chat bot right on the Coral Cloud website that can help guest in the following ways:
(1) Give them detailed information about each experience.
(2) Automatically check the guests schedule to see if an experience fits for them.
(3) Automatically book the experience for the guest checking availability.
Have fun building out this amazing solution for Coral Cloud Resorts.
Step I: Set up an Agentforce enabled playground org
Follow the trailhead step: https://trailhead.salesforce.com/content/learn/projects/quick-start-build-your-first-agent-with-agentforce/configure-an-agentforce-service-agent?trailmix_creator_id=teamtrailhead&trailmix_slug=quest-built-with-agentforce-video
For a detailed walkthrough on how to set up a Agentforce org please review our blog that walks through the process end to end: https://howtoagentforce.com/2024/12/26/how-to-get-set-up-with-agentforce/
Step II: Set up your new Agentforce playground org
Part I: Turn on key Einstein functionality

(1) In Setup.
(2) Type in “Einstein Setup”.
(3) Click on “Einstein Setup”.
(4) Turn on Einstein.

(1) While still in Setup.
(2) Search for “Agents”.
(3) Turn on Einstein Copilot for Salesforce.
Part II: Publish the Experience Cloud Site

(1) In Setup.
(2) In the search bar type in “all sites”.
(3) Click on All Sites.
(4) Click on the Builder link on the coral-cloud Experience Cloud site.
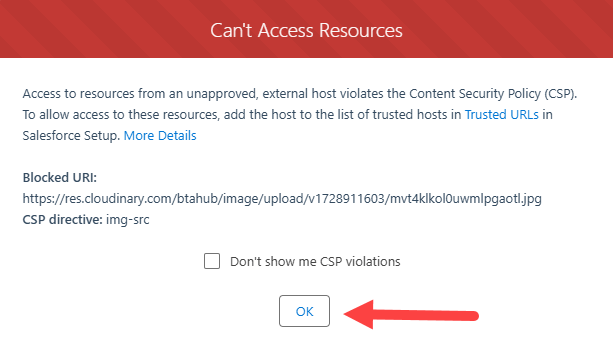
You may get this warning popup, just click ok several times until it goes away.
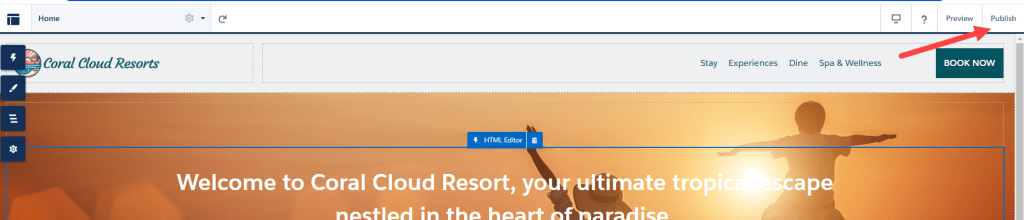
Click publish.
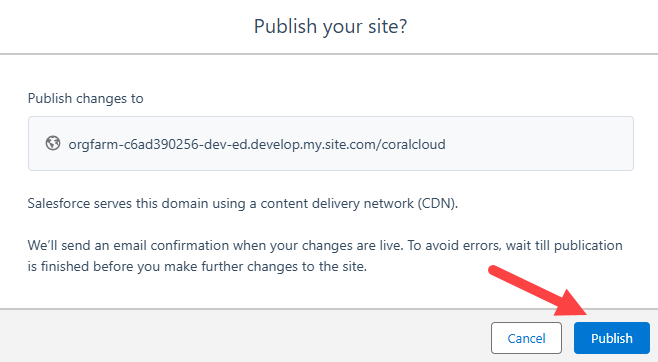
Click Publish.

Click Got It.

(1) In the upper right hand corner click on the Builder menu icon.
(2) Click on Salesforce Setup. You will be returned to Setup.
Part III: Add a Permission Set to the Agent’s User Profile

(1) In Setup.
(2) Search for Users.
(3) Click on Users.
(4) Click on the EinsteinServiceAgent User.

(1) Scroll down to Permission Set Assignments.
(2) Click on Edit Assignments.

(1) Navigate to Service Agent Permissions.
(2) Click “Add” to the right.
(3) Click Save.
Step III: Create the Agentforce Agent
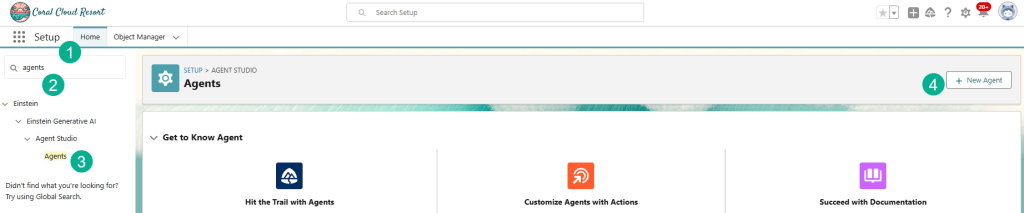
(1) Click on Setup.
(2) Type in “Agents”.
(3) Click on “Agents”.
(4) Click on “New Agent”.
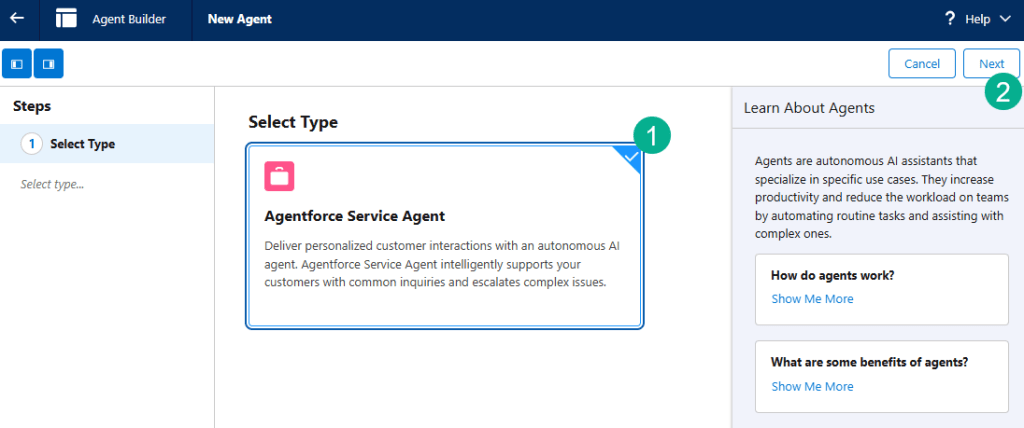
(1) Click on Agentforce Service Agent.
(2) Click Next.
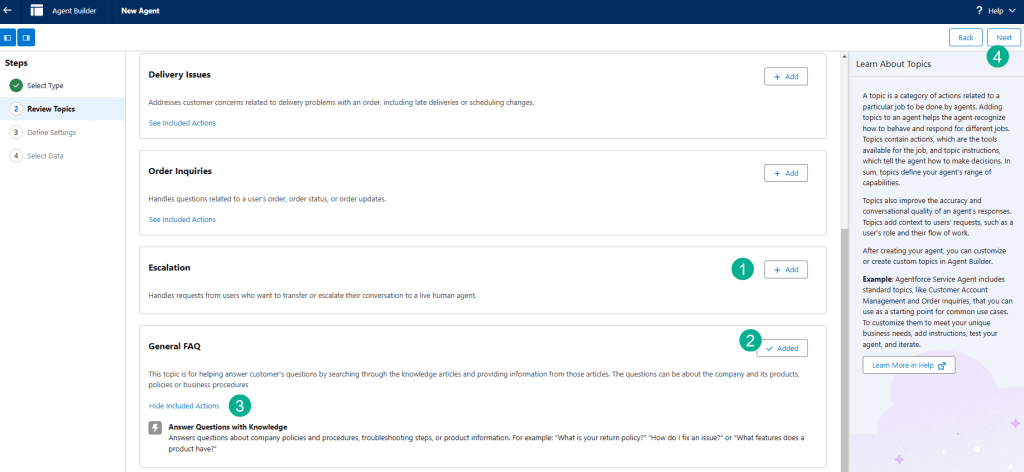
(1) Unselect all review Topics except for…
(2) Leave General FAQ as Added.
(3) Click on Hide Included Actions to see what actions this topic includes.
(4) Click Next.
Fill out the settings using the following values:
| Field | Value |
| Name | CC Service Agent |
| API Name | Default |
| Description | Leave as is |
| Company | Coral Cloud Resorts provides customers with exceptional destination activities, unforgettable experiences, and reservation services, all backed by a commitment to top-notch customer service. |
| Agent User | Select EinsteinServiceAgent |
| Enrich event logs with conversation data | Leave unchecked |
Once complete the form should look like this:
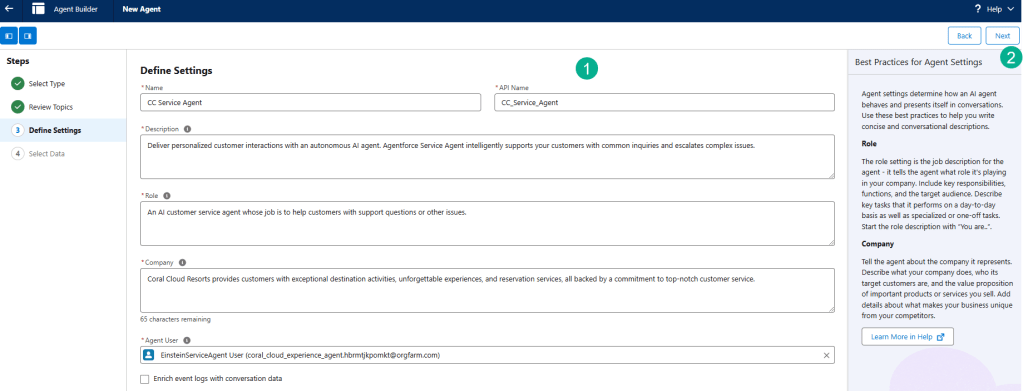
(1) Fill in the fields as detailed above.
(2) Once everything looks good, click Next.
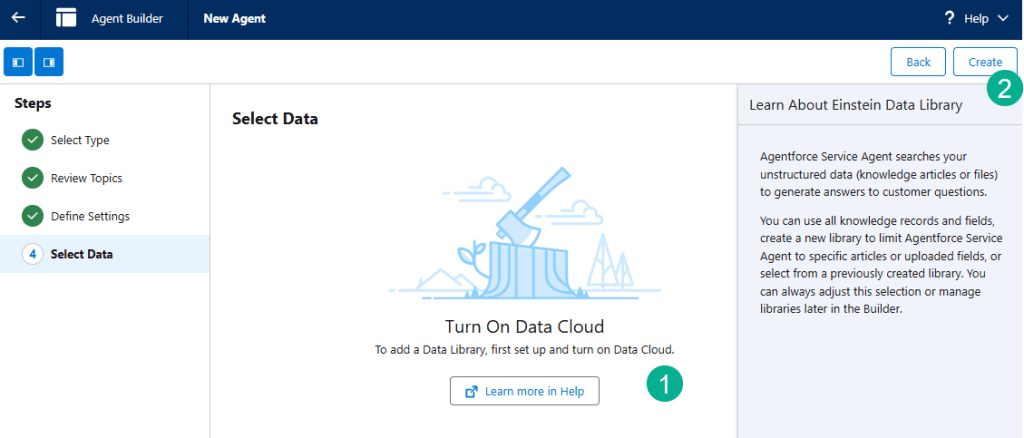
(1) Don’t worry about turning on Data Cloud for now.
(2) Click Create.
Step IV: Add Custom Topics and Actions
Part I: Add Experience Management Topic
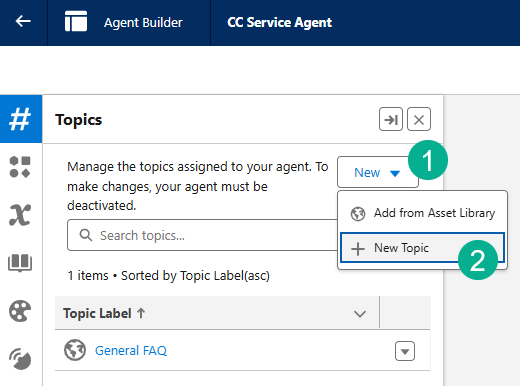
(1) Under Topics click on New.
(2) Click on New Topic.
Fill in the topic based on these values:
| Field | Value |
| Topic Label | Experience Management |
| Classification Description | This topic addresses customer inquiries and issues related to booking experiences at Coral Cloud Resort, including making reservations, modifying bookings, and answering queries about experience details. |
| Scope | The agent’s job is to assist users in navigating and managing bookings for different experiences offered by Coral Cloud Resort, ensuring a seamless customer service experience by providing accurate information and resolving issues promptly. |
| Instruction | If a customer would like more information on Activities or Experiences, you should run the action ‘Get Experience Details’ and then summarize the results with improved readability. Always ensure you know the customer before running this action. |
When complete it should look like this:
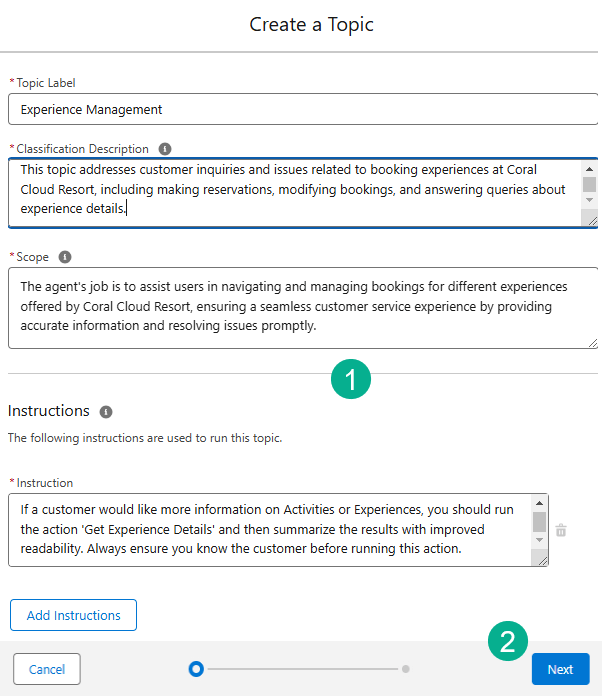
(1) Fill in all the required fields.
(2) Click Next.
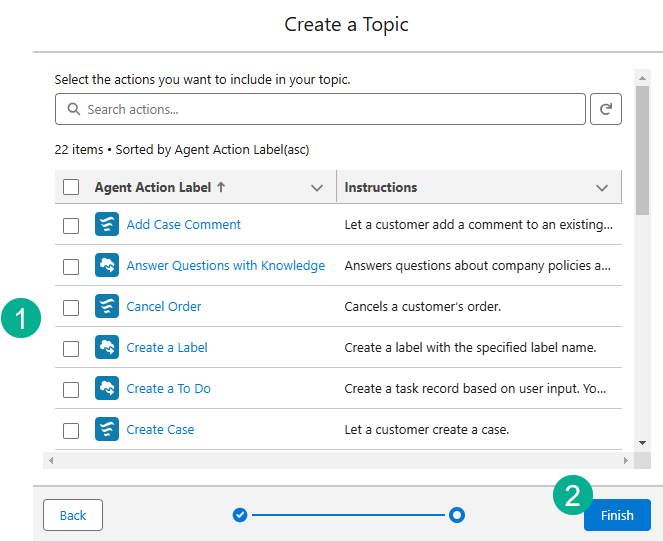
(1) No need to select any of the actions.
(2) Click Finish.
Part II: Add the Get Experience Details Action to the Agent

Click on the Experience Management topic.

(1) Click This Topic’s Action.
(2) Click on the New button.
(3) Click Add Action.
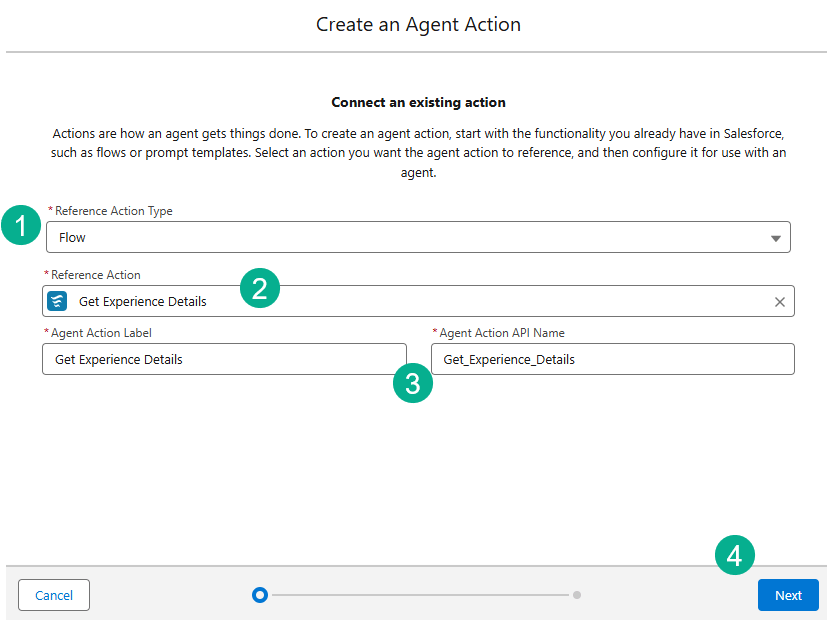
(1) For Reference Action Type: select Flow.
(2) For Reference Action: Select Get Experience Details.
(3) Leave the Agent Action Label and Agent Action API Name as is.
(4) Click Next.
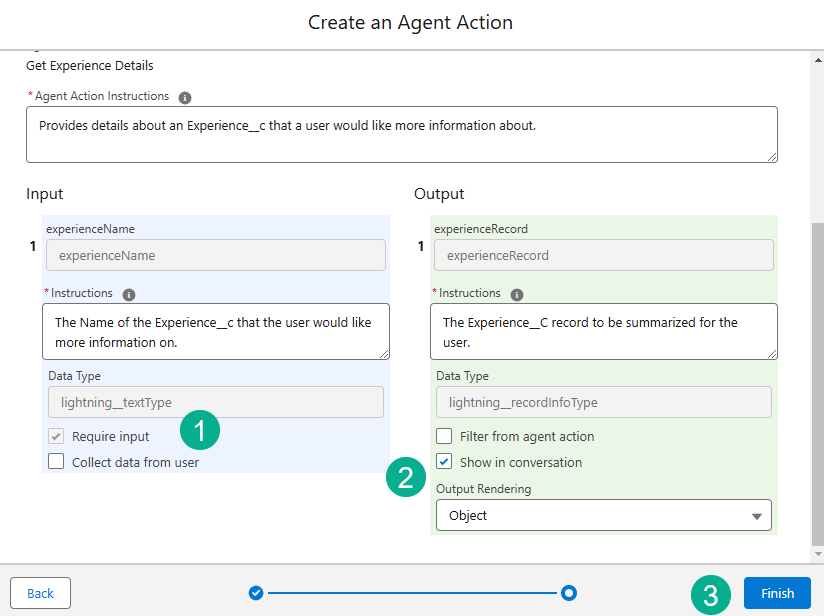
(1) Select Require Input for experienceName.
(2) Select Show in conversation for experienceRecord.
(3) Click Finish.
Part III: Add an Action to Validate Customer Details
This action will validate the customer using the chat bot by asking for their email and membership number which will return a Salesforce Contact ID for use later by the agent.

(1) Click This Topic’s Action.
(2) Click on the New button.
(3) Click Add Action.
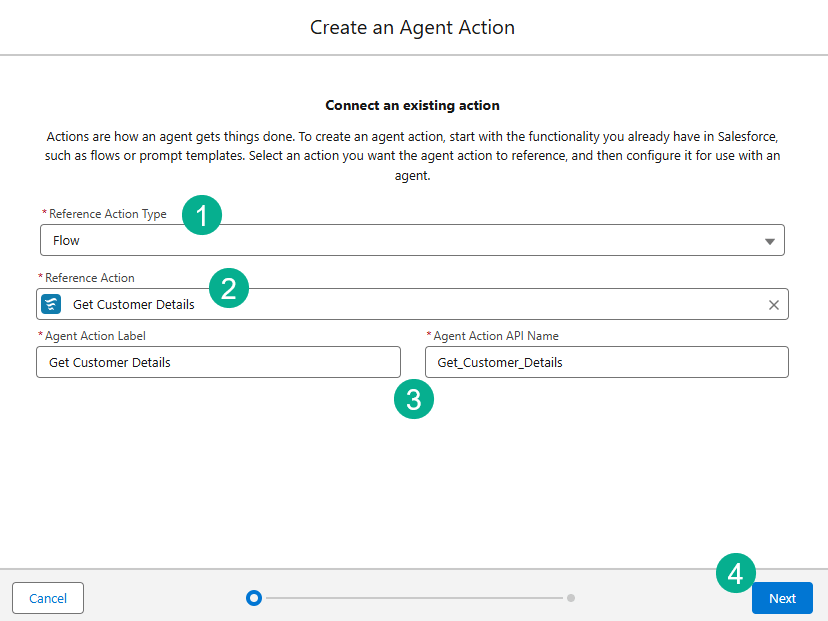
(1) For Reference Action Type: select Flow.
(2) For Reference Action: Select Get Customer Details.
(3) Leave the Agent Action Label and Agent Action API Name as is.
(4) Click Next.
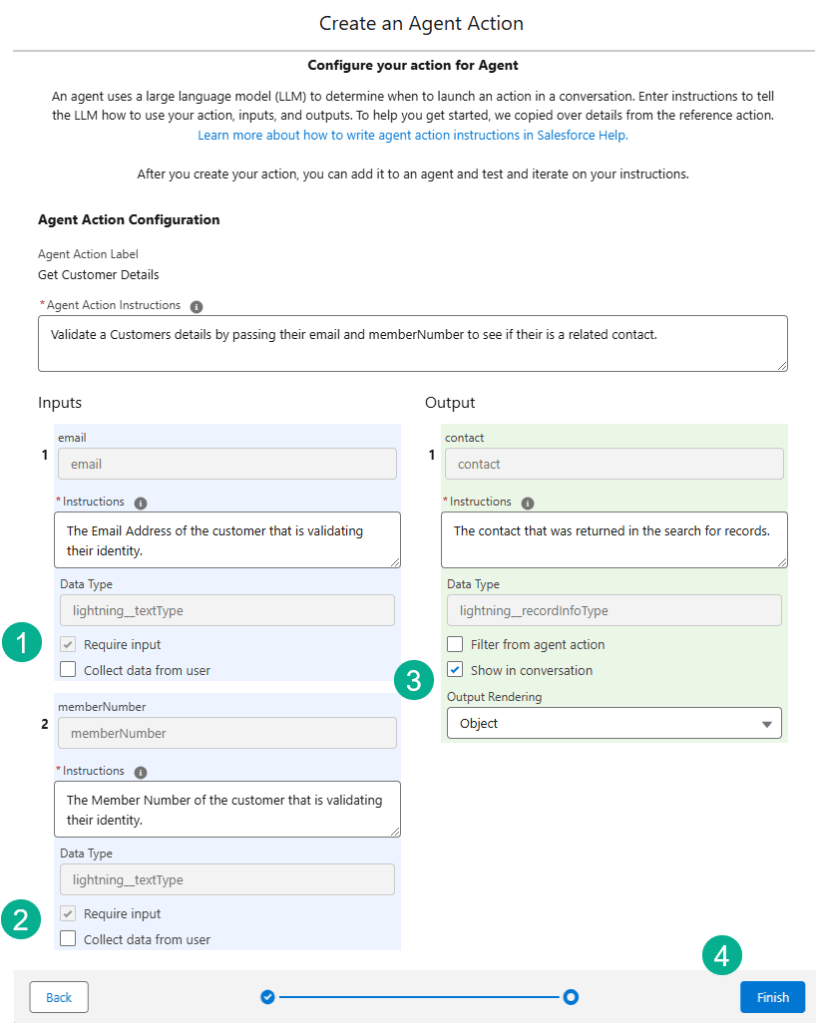
(1) Select Require Input for email.
(2) Select Require Input for memberNumber.
(3) Select Show in conversation for contact.
(4) Click Finish.
Part IV: Add an Action to Get Session Records
This action will pull in all the available sessions for each experience to facilitate the booking.
(1) Click This Topic’s Action.
(2) Click on the New button.
(3) Click Add Action.
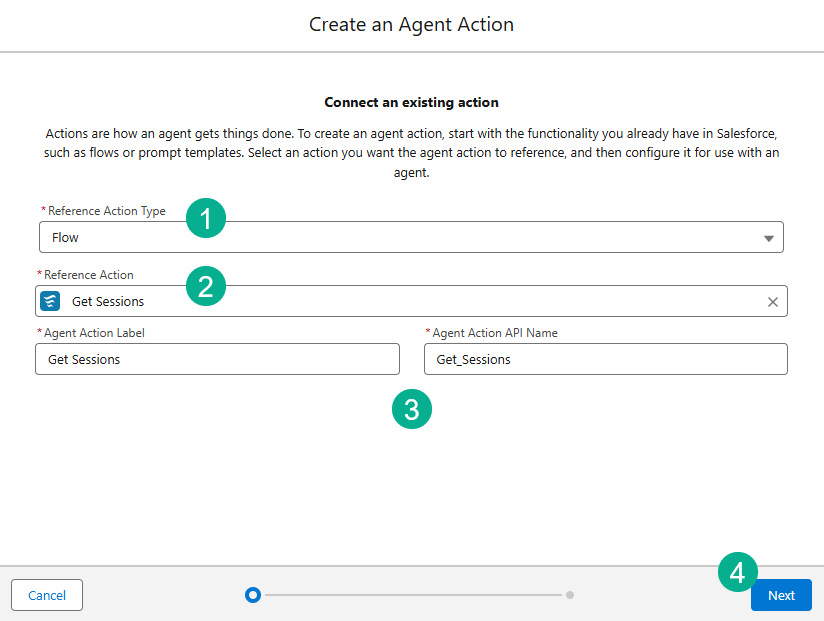
(1) For Reference Action Type: select Flow.
(2) For Reference Action: Select Get Sessions.
(3) Leave the Agent Action Label and Agent Action API Name as is.
(4) Click Next.

(1) Select Require Input for experienceid.
(2) Select Require Input for startDate.
(3) Select Show in conversation for sessions.
(4) Click Finish.
Part V: Add an Action to Generate a Personalized Schedule
This action will pull in a pre-configured prompt that will provide personalized recommendations based on the Contact’s schedule.
(1) Click This Topic’s Action.
(2) Click on the New button.
(3) Click Add Action.

(1) For Reference Action Type: select Prompt Template.
(2) For Reference Action: Select Generate Personalized Schedule.
(3) Leave the Agent Action Label and Agent Action API Name as is.
(4) Click Next.
Configure the following:
| Field | Value |
| Agent Action Instructions | Generate a personalized schedule that includes the time and location of resort experiences that are available today, and that match the guest’s interests. |
| Contact Input Instructions | Contact for which the personalized schedule should be generated. Must be a valid JSON representing the contact info, chained from having executed the Get Customer Details action. |
When complete it should look like this:
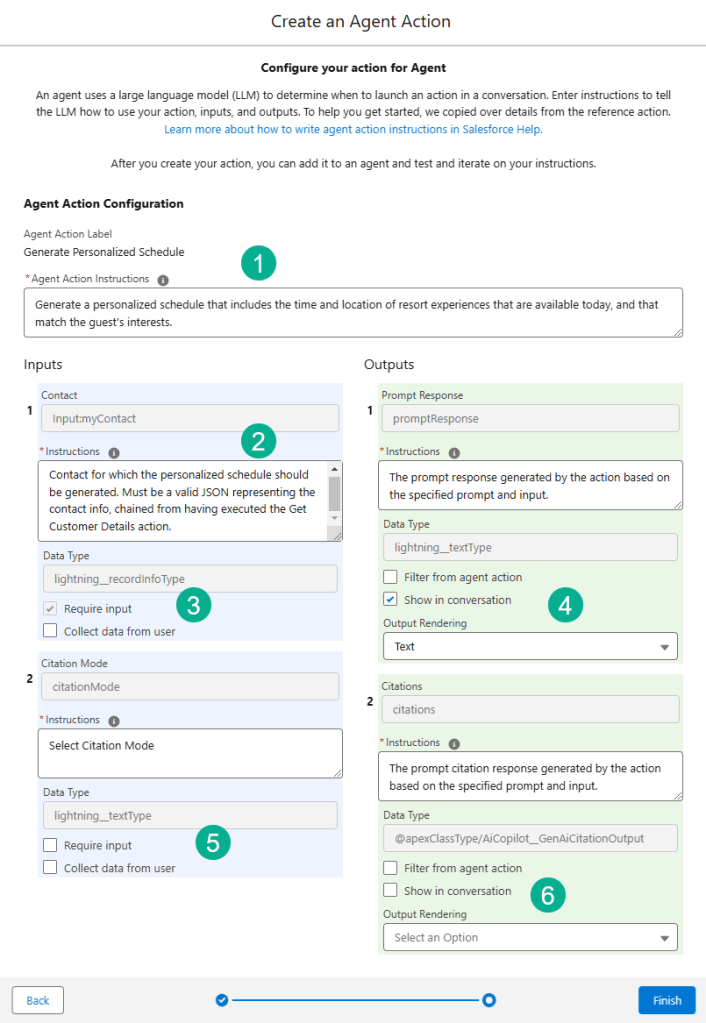
(1) Paste in the Agent Action Instructions.
(2) Paste in the Contact Input Instructions.
(3) Select Require Input for Contact.
(4) Select Show in conversation for Prompt Response.
(5) Do not select Require Input for Citation Mode.
(6) Do not select Show in conversation for Citations.
Part VI: Add an Action to Create a Booking
If the recommendation to the client makes sense this action will book the experience for the customer.
(1) Click This Topic’s Action.
(2) Click on the New button.
(3) Click Add Action.
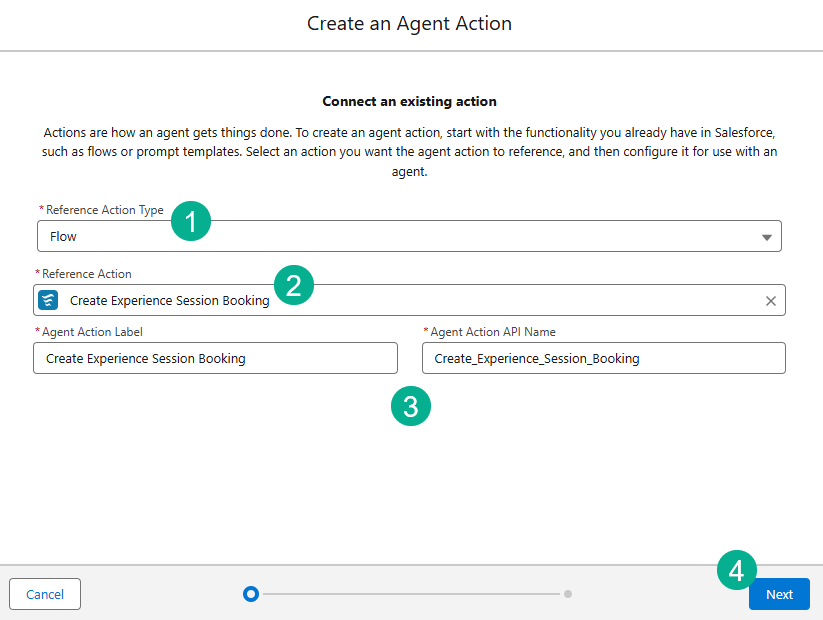
(1) For Reference Action Type: select Flow.
(2) For Reference Action: Select Create Experience Session Booking.
(3) Leave the Agent Action Label and Agent Action API Name as is.
(4) Click Next.

(1) Select Require Input for Contact_Id.
(2) Select Require Input for Guests.
(3) Select Collect data from user for Guests.
(4) Select Require Input for Session_Id.
(5) Select Show in conversation for Booking.
(6) Select Show in conversation for Output_Message.
(7) Click Finish.
Part VII: Provide the Agent with Instructions to Choose the Correct Action
The Agent has a lot of actions to choose from, now we need to instruct it on how to use each action to get the optimal result.
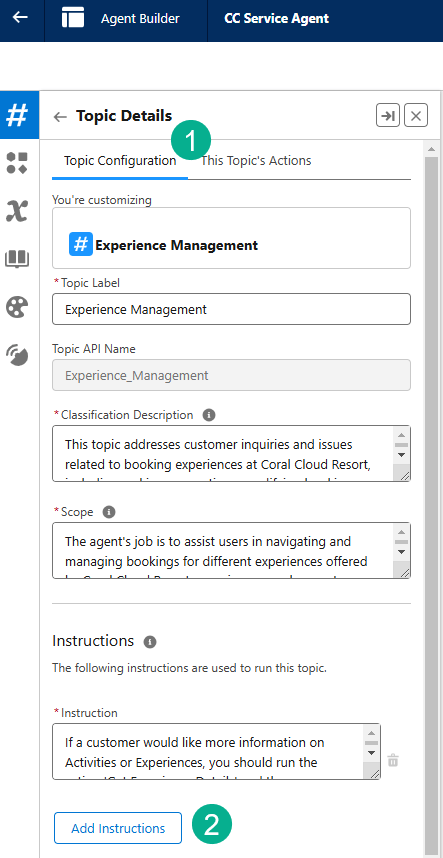
(1) Still in the same Agent Topic, select Topic Configuration.
(2) Click Add Instructions and add the following instructions one by one.
| Field | Value |
| 1st Instruction | (leave as is) |
| 2nd Instruction | If the customer is not known, you must always ask for their email address and their membership number to get their Contact record by running the action ‘Get Customer Details’ before running any other actions. |
| 3rd Instruction | Whenever a date is provided, convert the date to YYYY-MM-DD format and ensure that the date is not in the past before using it for the ‘Get Sessions’ action. If a past date is provided, explain to the client the date must be future. |
| 4th Instruction | If asked to get sessions for the experience use the ‘Get Sessions’ action. Ask for the Date of the sessions if not provided. Use the Id of the Experience__c from the ‘Get Experience Details’. Do not use the experience name, this must be an ID. |
| 5th Instruction | If asked to book, use the action ‘Create Booking’. The Contact__c is the contact ID from the ‘Get Customer Details’. The Session__c is the ID of the session from the action ‘Get Sessions’. If multiple sessions are present, ask to select one of the sessions and use that Session as the ID for the Session__c. Prompt for the Number of Guests and use that for the Number_of_Guests__c. |
| 6th Instruction | If asked to recommend experiences that a user might be interested in, use the ‘Generate Personalized Schedule’ Action to generate a schedule based on a contacts interests. Use the contact record from ‘Get Customer Details’ and pass it into the Contact input. |
When complete it should look like this:
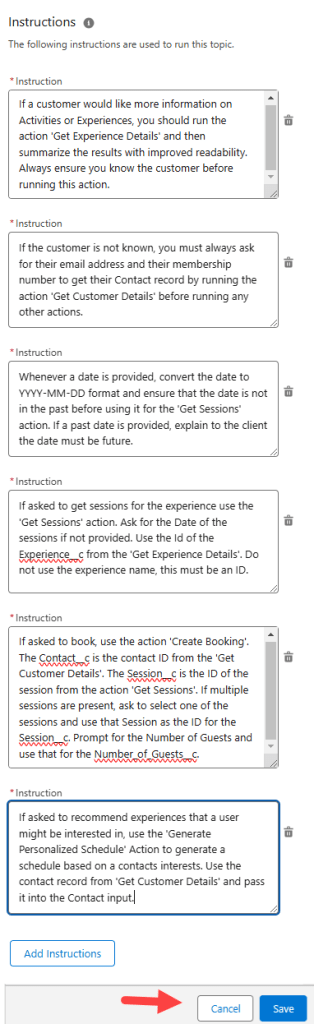
Click Save.

(1) Click Activate.
(2) Click on the refresh button to refresh the data.
Step IV: Test the Agent.
Now let’s put the Agent to the test.
Enter the following in the conversation window: Can you let me know more about the full moon beach party experience?
You’ll need to provide an email address and membership number:
Email Address: sofiarodriguez@example.com
Membership Number: 10008155
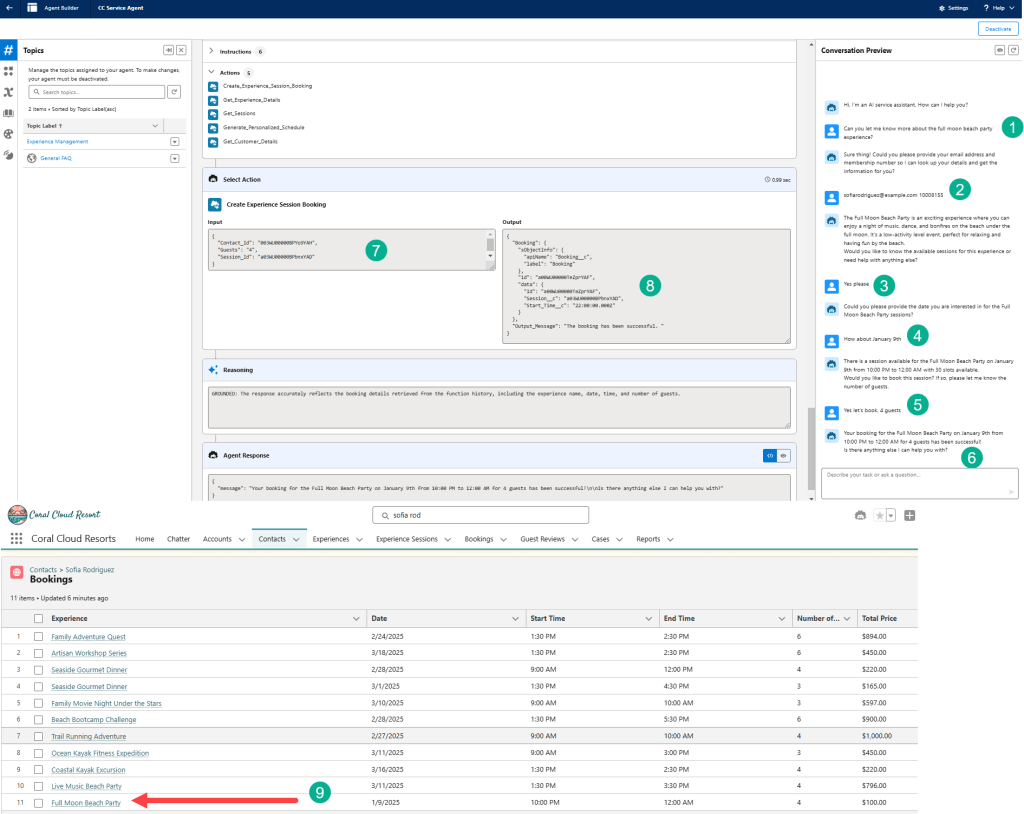
(1) Enter in the first message above: Can you let me know more about the full moon beach party experience?
(2) Enter in email and membership id.
(3) Respond with Yes to view available sessions.
(4) Provide an approximate date to check reservations.
(5) Provide the ok to book and the number of guests.
(6) The experience is booked by the Agent!
(7) In the center console as you are responding with the agent validate each action is pulling in the right inputs and outputting the right values.
(8) See the data be populated in the Output, the booking and session id.
(9) In Sofia’s Contact record validation the booking was made.
Step V: Publish and Update – publish the web deployment and update the flow
Part I: Publish the Web Deployment
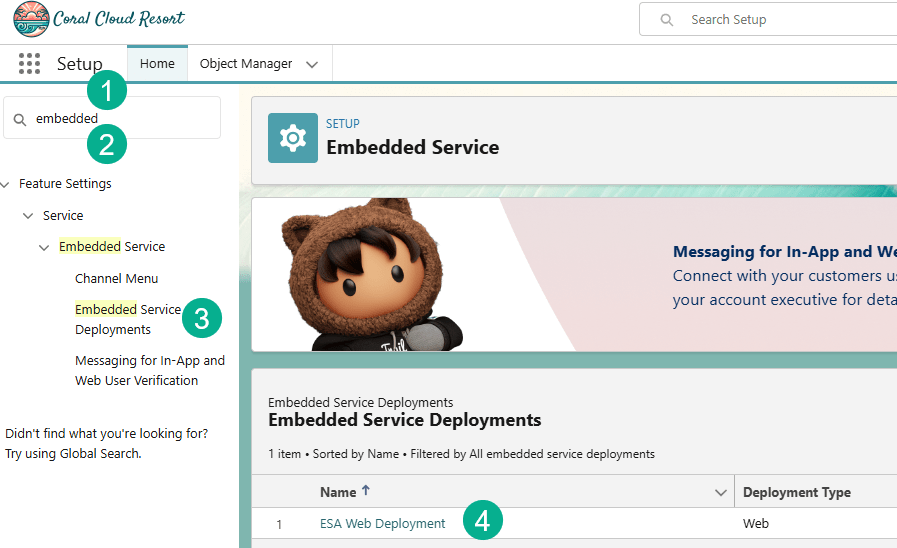
(1) In Setup.
(2) Search for Embedded.
(3) Select Embedded Service Deployments.
(4) Click on ESA Web Deployment.

Click Publish.

Part II: Re-route the flow
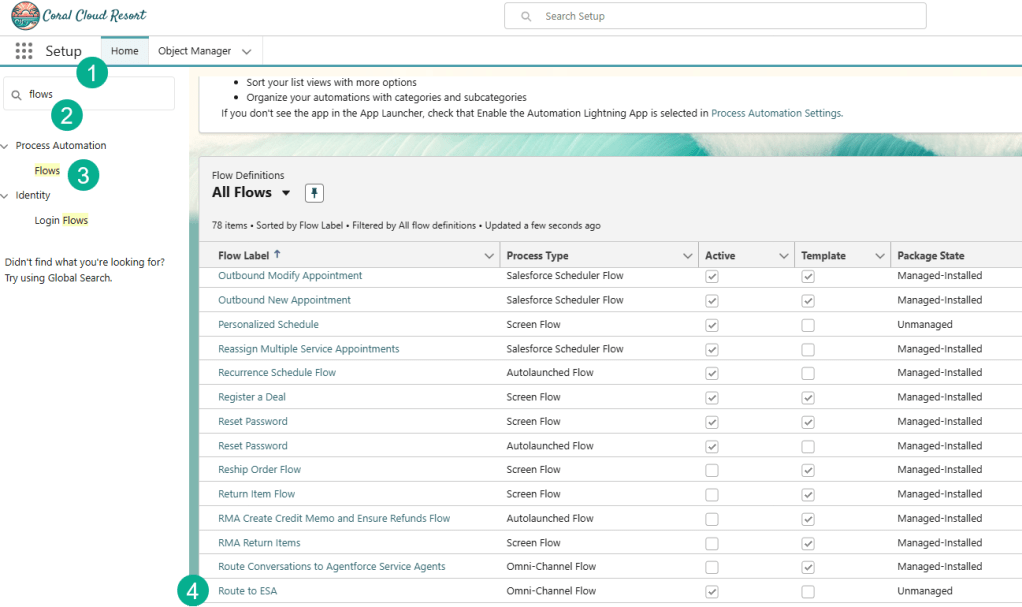
(1) In Setup.
(2) Search for Flows.
(3) Click on Flows.
(4) Search for and click on flow: Route to ESA.
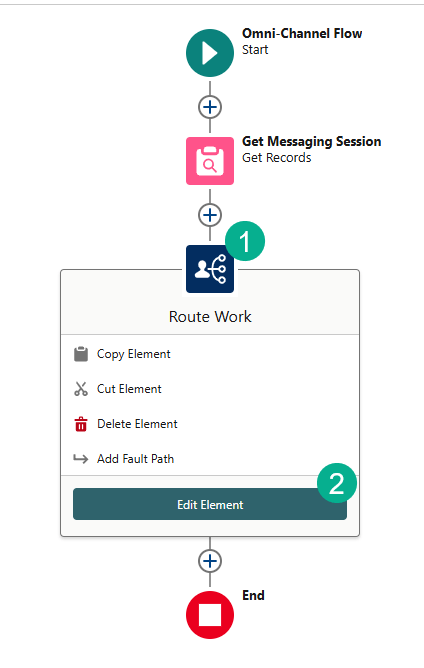
(1) Click on the Rote to ESA component.
(2) Select Edit Element.
Select these values in the Set Input Values section:
| Field | Value |
| Route to | Agentforce Service Agent |
| Agentforce Service Agent | CC Service Agent |
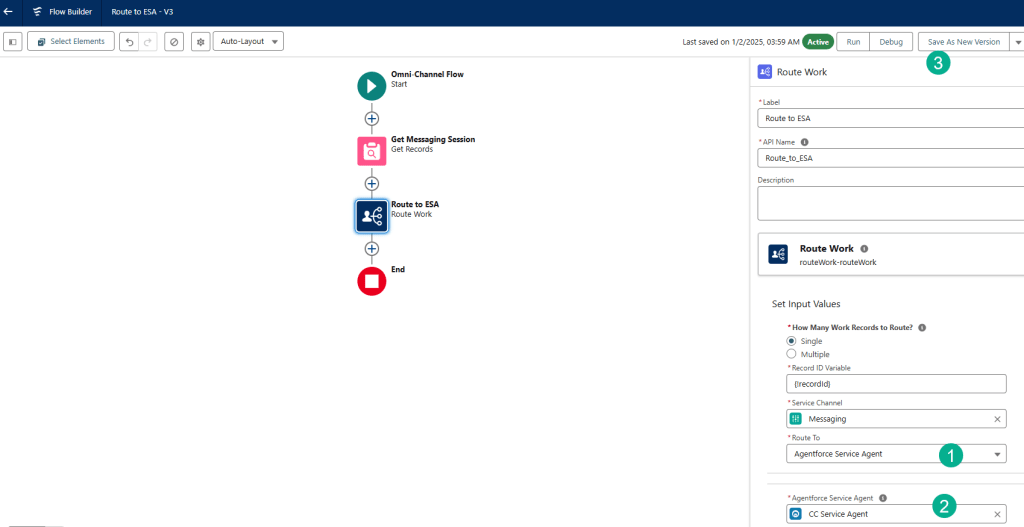
(1) Enter Route to here:
(2) Agentforce Service Agent here:
(3) Click Save As New Version

Leave everything as is and click Save.

Click Activate.

Step VI: Add the Agent to the Experience Cloud site (Coral Cloud)

(1) In Setup.
(2) Type in All Sites.
(3) Click on All Sites.
(4) Select the Builder for coral-cloud.

(1) Click on the Components widget (lightning bolt).
(2) Search for Embedded.
(3) Drag and drop the Embedded Messaging component over the Book an Experience of a Lifetime banner.
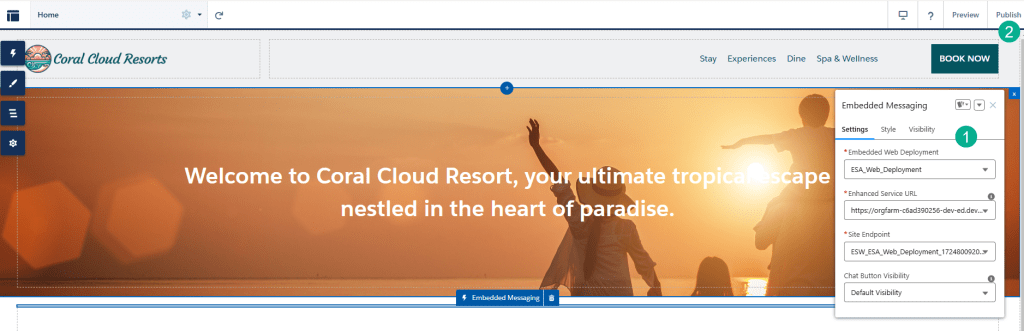
(1) Leave the Embedded Messaging settings as they are.
(2) Click Publish.

Click Publish.

Click Got It.
Step VII: View the Agent as a customer
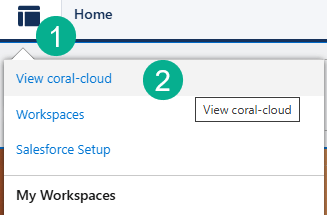
(1) Click on the Experience Builder Menu.
(2) Select View coral-cloud

View the messaging icon that appears at the bottom of the Experience Home Page. Click on the icon.
Enter in a new experience use case/booking.
First response: Can you let me know about the Underground Cave Exploration?
Email: sofiarodriguez@example.com
Membership ID: 10008155
You should be able to replicate the same conversation.

And the end results a booking is scheduled that doesn’t conflict with any other booking.

Wow, wasn’t that amazing! You just built a very cool AI Service Agent that accomplished all the goals of the solution:
(1) Give them detailed information about each experience.
(2) Automatically check the guests schedule to see if an experience fits for them.
(3) Automatically book the experience for the guest checking availability.
Now that you have a Agentforce demo org, make the most of it and explore other ways to digitize your labor force with Agentforce.
